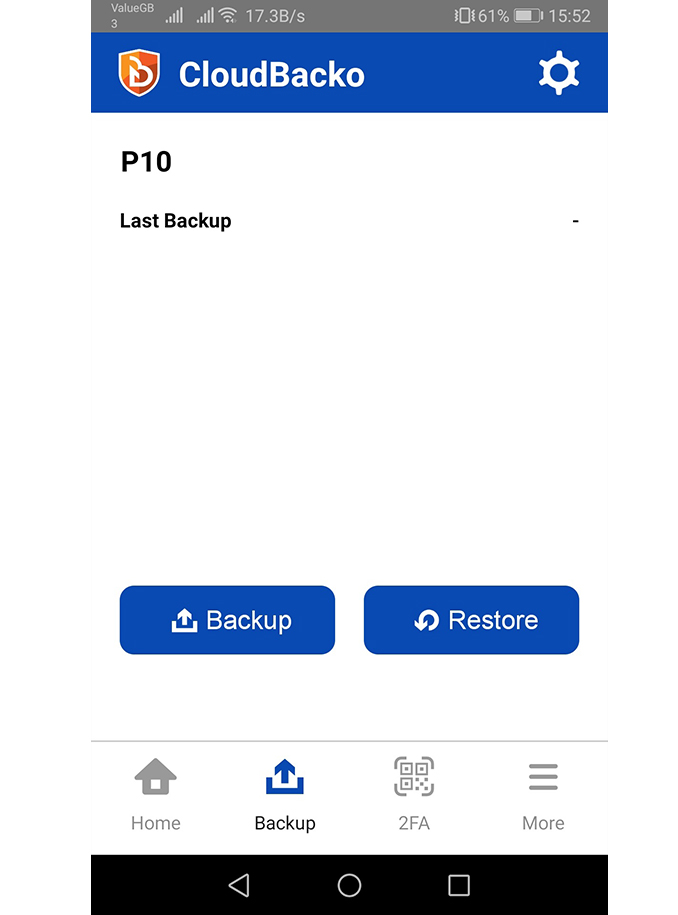
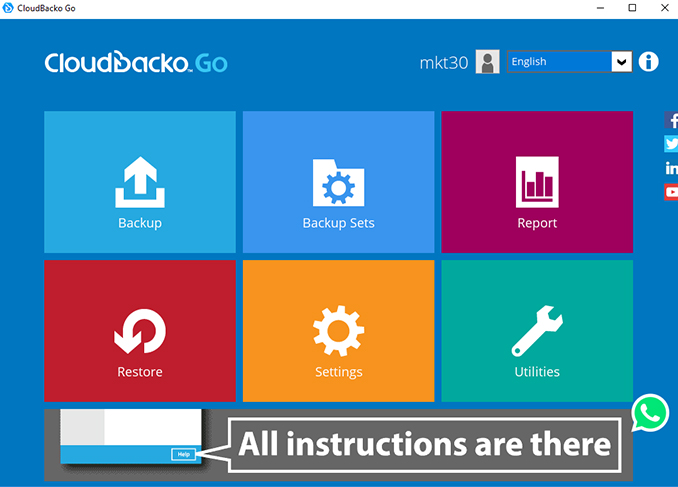
Step 3 - Backup
Get your backups running in less than 2 minutes! Download, install, and register for our free trial Now!
Choose what you want to backup
- Files
- Microsoft Office 365
- Virtual Machines
- NAS
- Databases
- Microsoft Exchange Server
- Microsoft Windows
- Cloud Storages
- Mobile
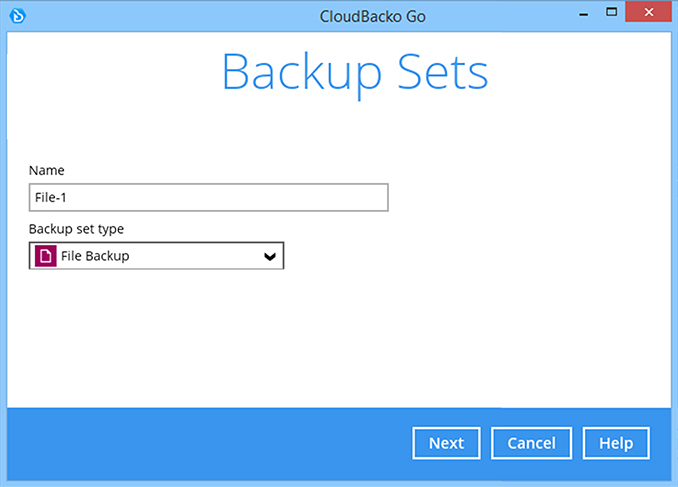
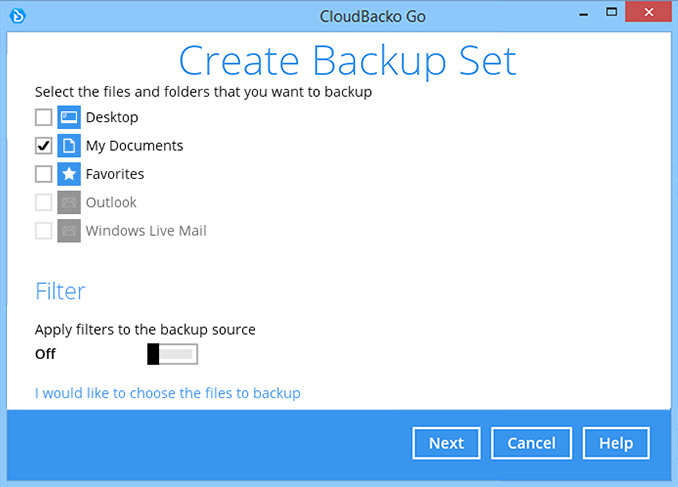
How to create a File backup
-
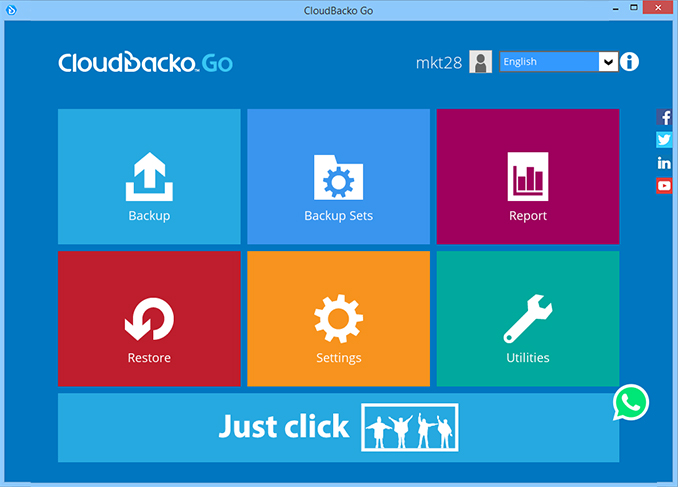
After login to Cloudbacko, click on the Backup Sets tile.

-
Click on the “+” to add new backup set.

-
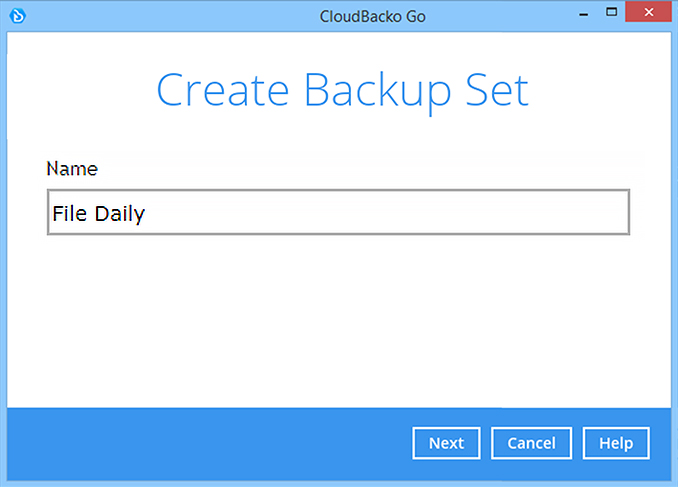
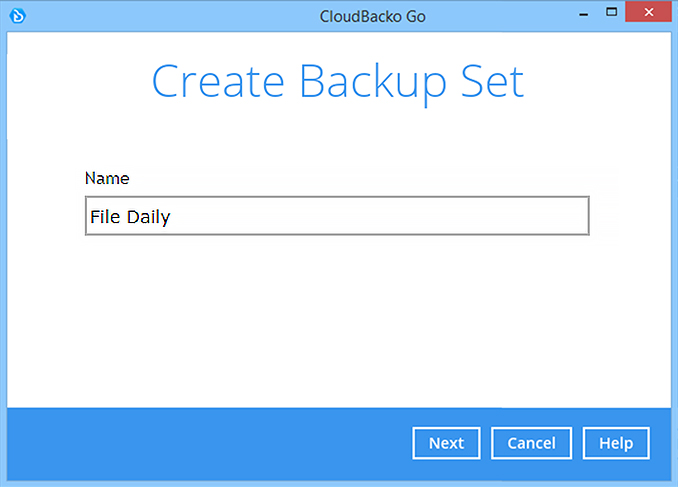
Enter the backup set name, i.e. File Daily. Select the Backup set type File Backup and click Next to continue.
-
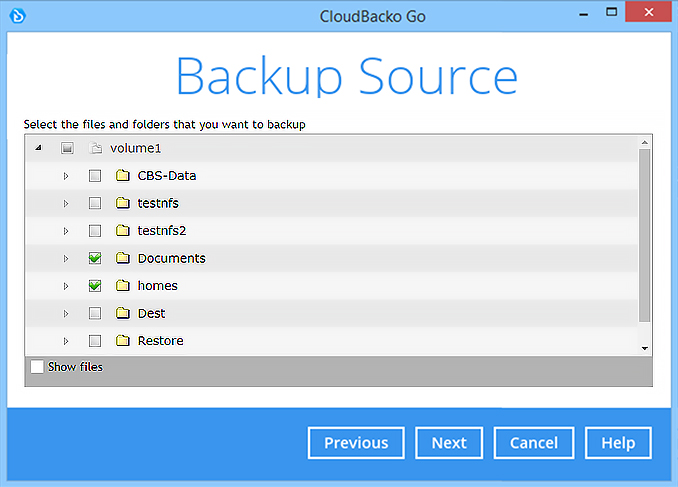
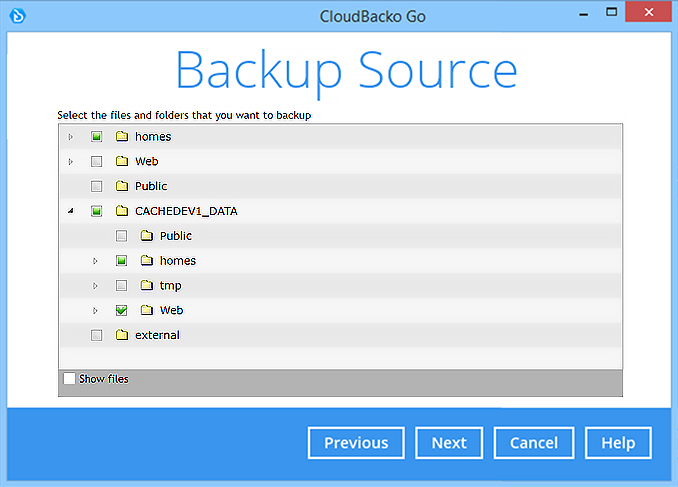
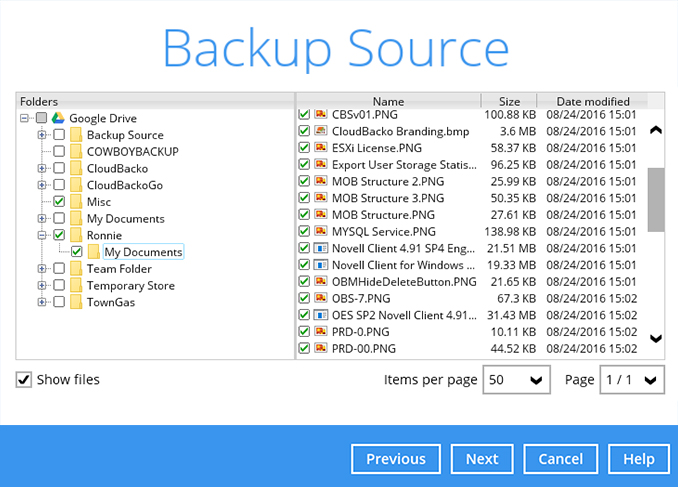
Select some files to backup, i.e. the “My Documents” folder. Click Next to continue.
-
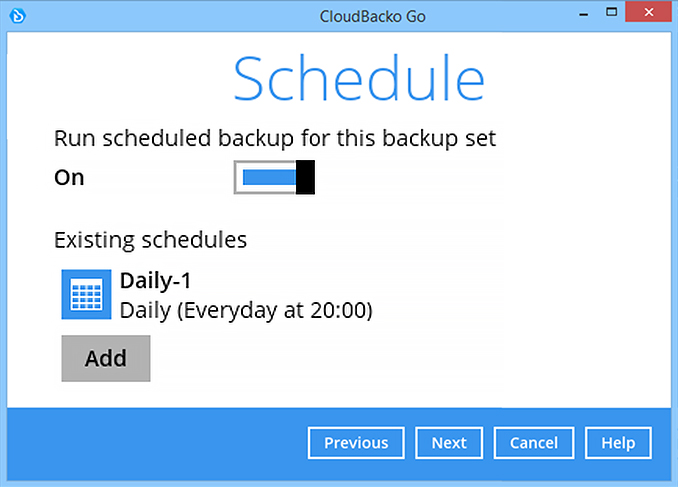
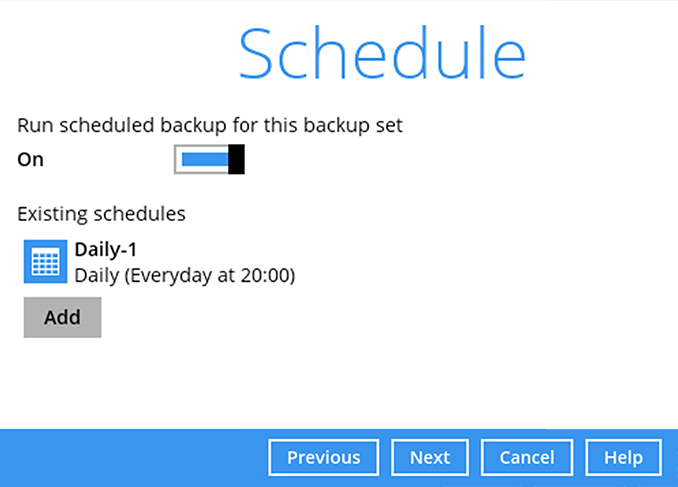
Create an automatic backup schedule, i.e. 20:00 daily and click Next to continue.
-
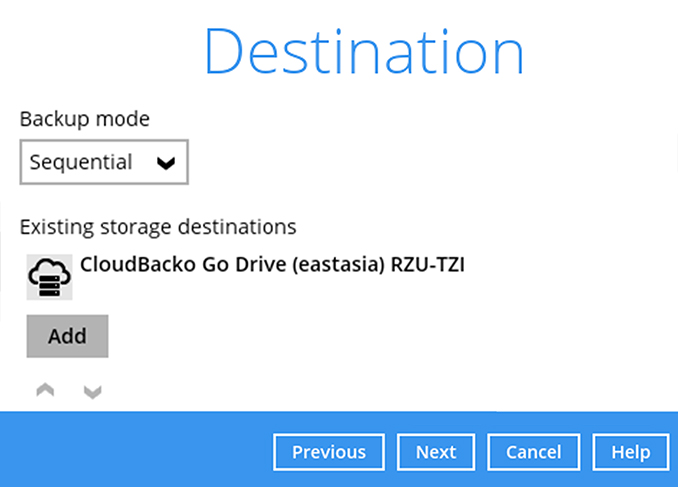
Select a storage destination, i.e. CloudBacko Drive. Click Next to continue.

-
Use default settings. Click Next to continue.
-
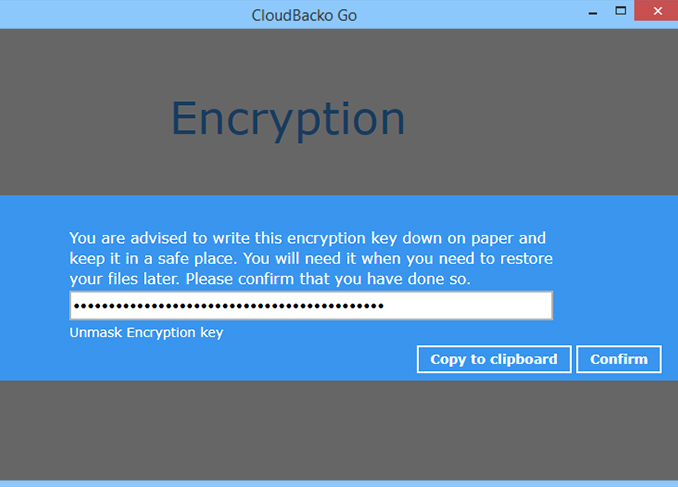
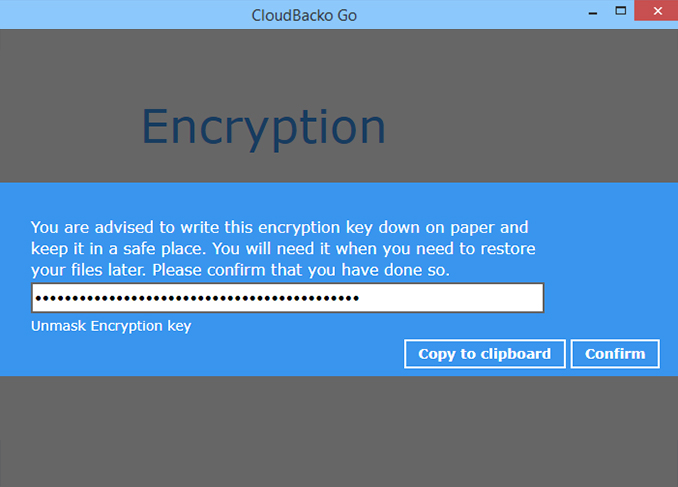
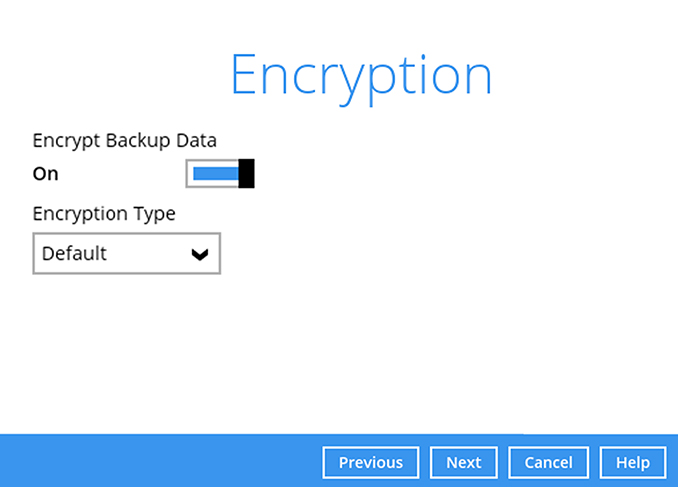
Use default encryption settings. Click Next to continue.

-
Click Confirm to continue.

-
Enter the Windows login password. Click Next to continue.
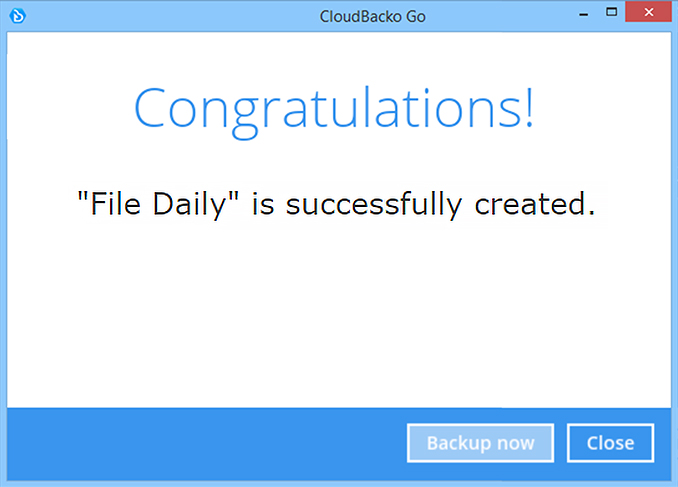
-
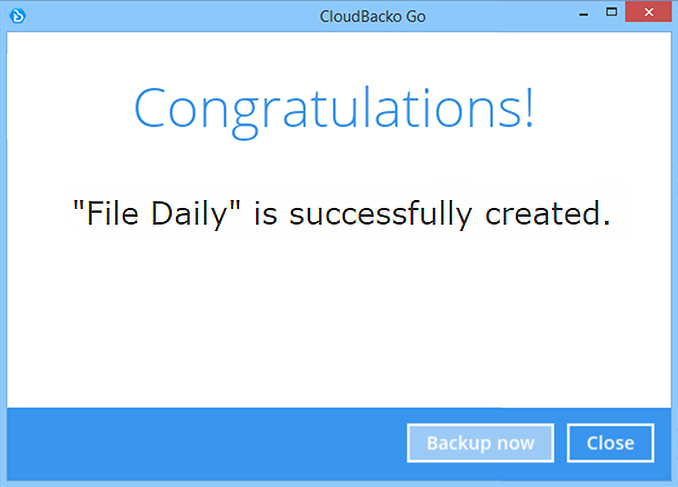
Backup set is created.
Click on Backup now to start a backup job or wait for the automated backup to start.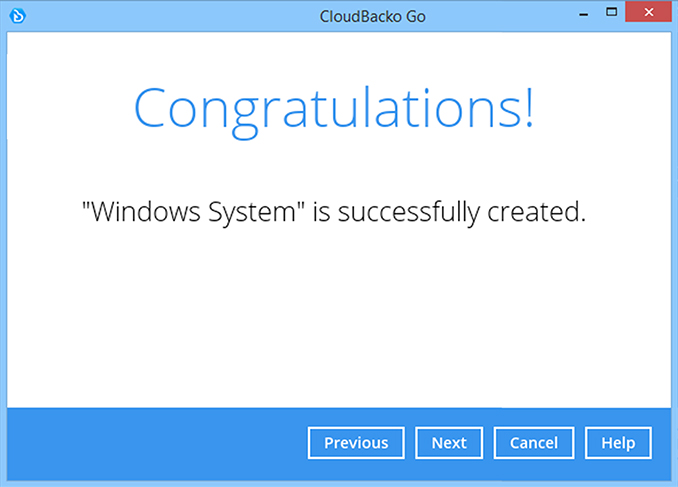


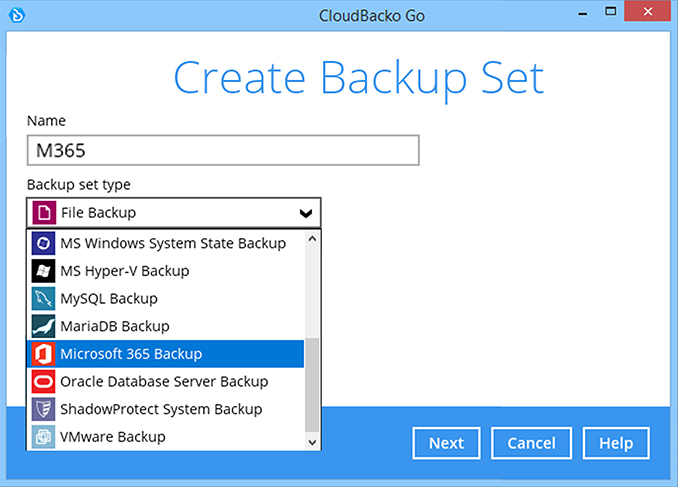
How to create a Microsoft Office 365 backup
-
After login to Cloudbacko, click on the Backup Sets tile.
-
Click on the “+” to add new backup set.

-
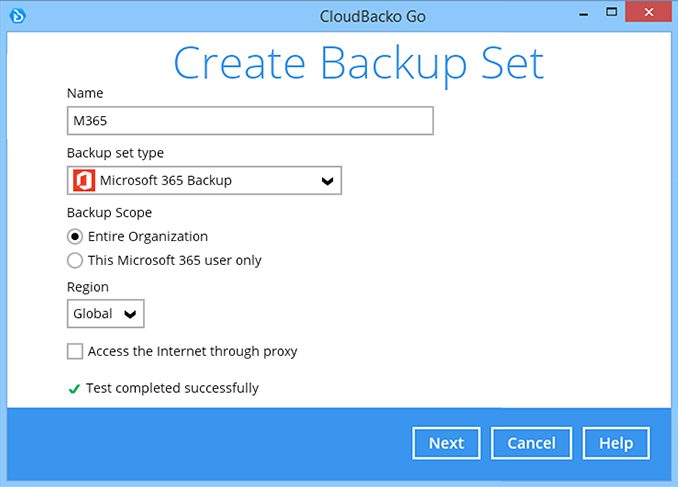
Enter the backup name, i.e. "M365" and select backup set type Microsoft 365 Backup. Click Next to continue.
-
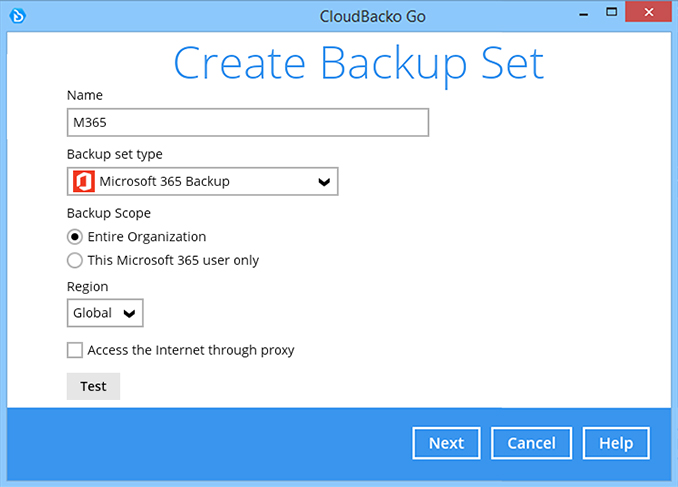
Use the default Region Global. Click Test or Next to continue.
-
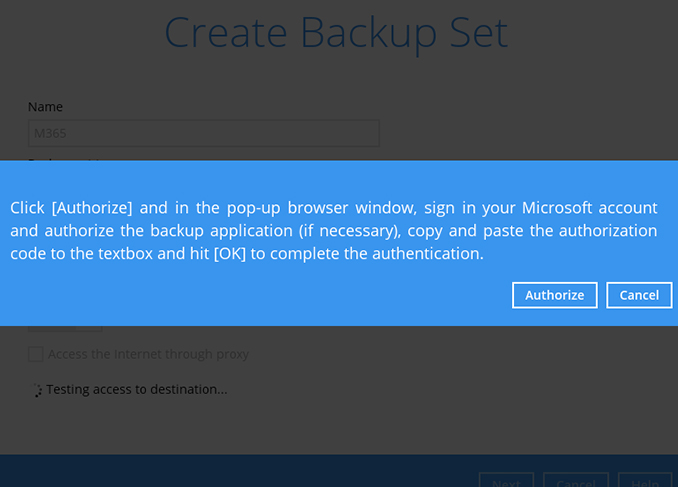
Click Authorize to continue.
-
Enter the Microsoft 365 username. Click Next to continue.
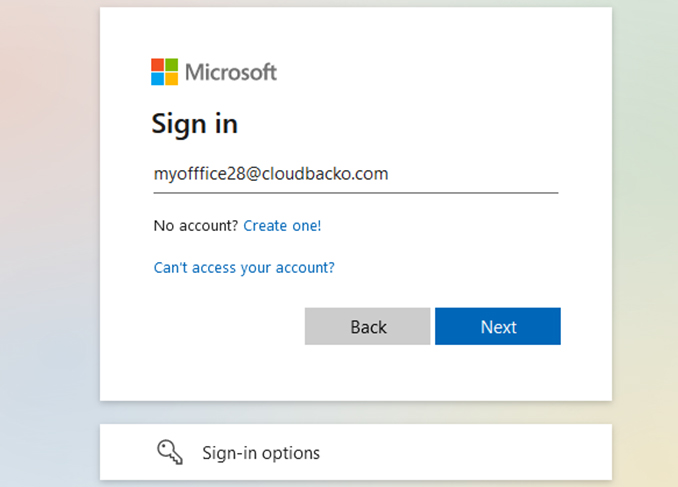
-
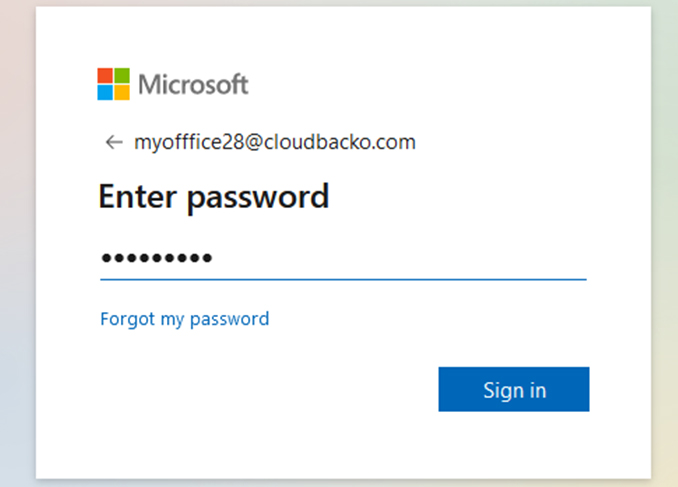
Enter the password. Click Sign in to continue.
-
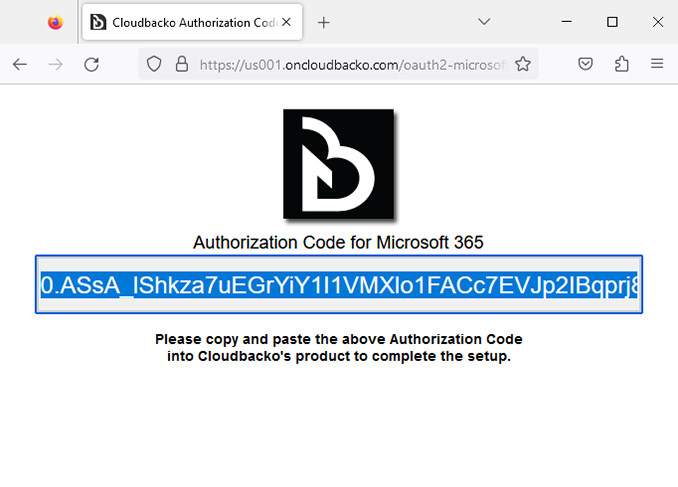
When the Authorization Code for Microsoft 365 is displayed, copy the code
-
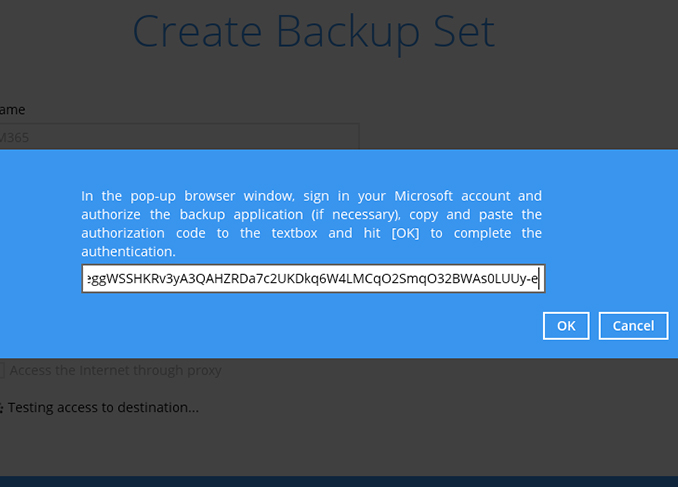
Paste the authorization code back to CloudBacko Go. Click OK to continue.
-
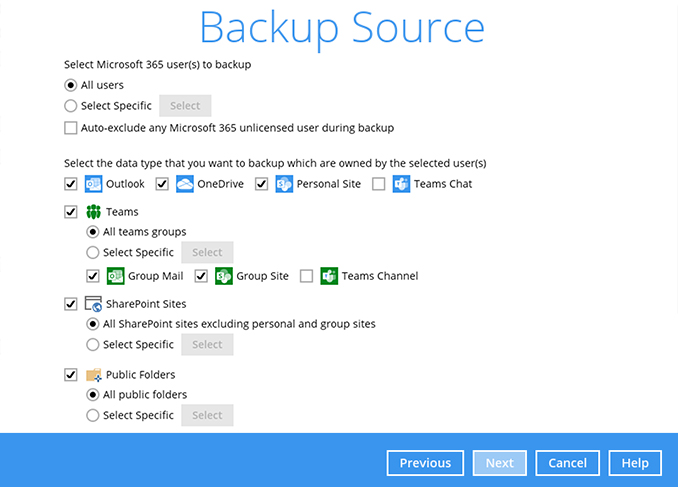
Select the components from the Microsoft 365 tenant to backup, i.e. All Outlook, OneDrive, SharePoint Sites, and Public Folders. Click Next to continue.
-
Create an automatic backup schedule, i.e. 20:00 daily and click Next to continue.
-
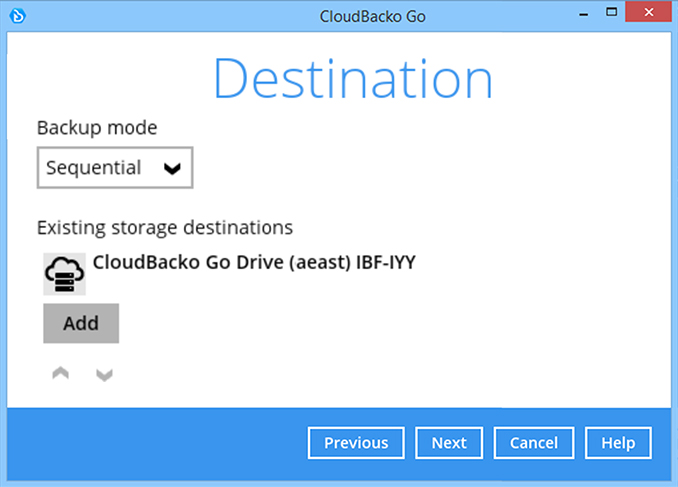
Select a storage destination, i.e. CloudBacko Drive. Click Next to continue.

-
Click Next to continue.
-
Use the default Encryption setting. Click Next to continue.

-
Click Confirm to continue.

-
Backup set is created.
Click on Backup now to start a backup job or wait for the automated backup to start.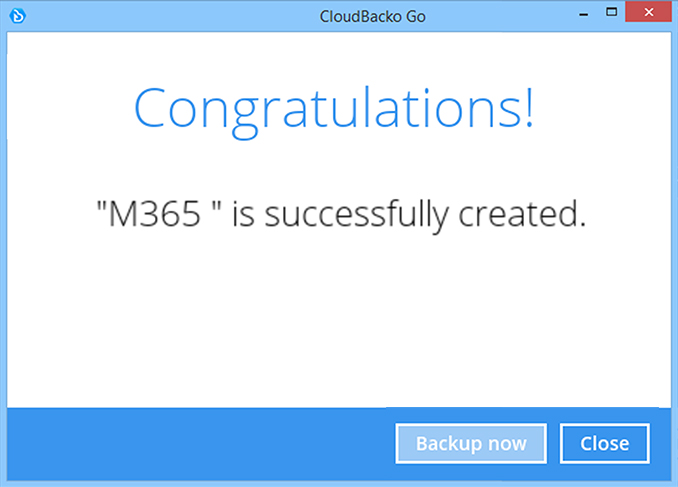


Choose the hypervisor that you want to backup
- HyperV
- VMware
How to create a Hyper-V backup
-
After login to Cloudbacko, click on the Backup Sets tile.

-
Click on the “+” to add new backup set.

-
Enter the name for example "Hyper-V Daily" and select backup set type MS Hyper-V Backup. Click Next to continue.
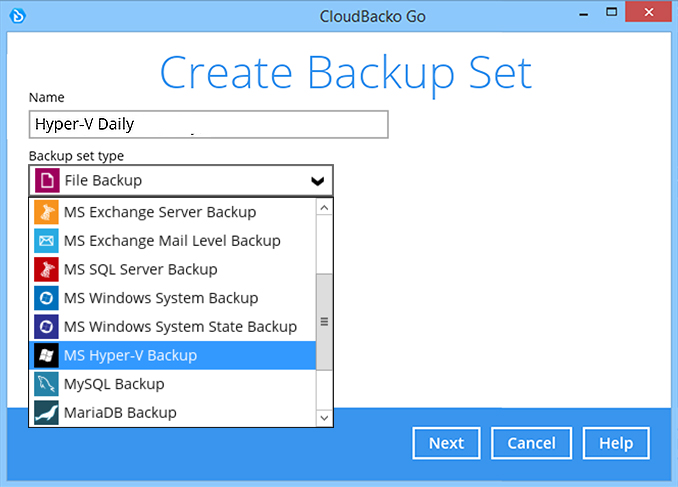
-
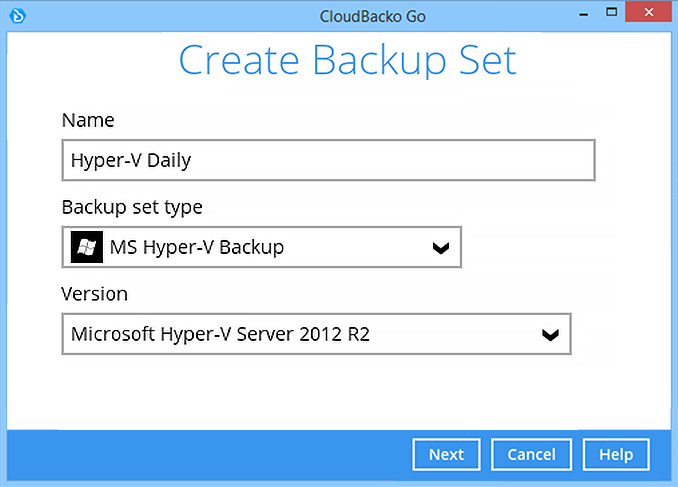
The Hyper-V server version is automatically detected by CloudBacko Go. Click Next to continue.
-
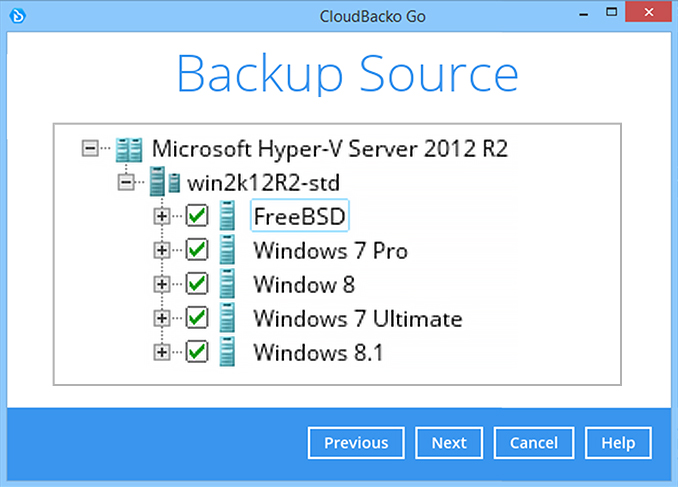
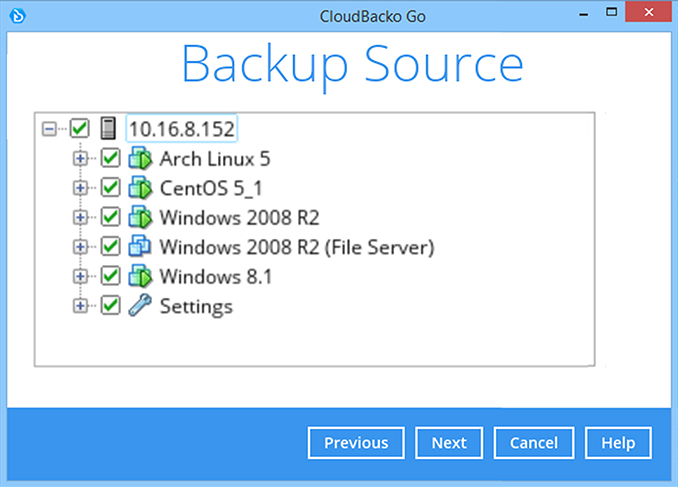
Select the virtual machines you wish to backup. Click Next to continue.
-
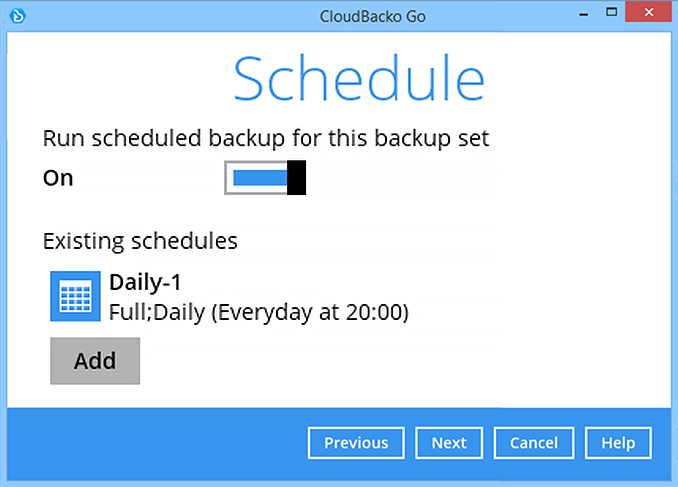
Create an automatic backup schedule, i.e. 20:00 daily and click Next to continue.
-
Select a storage destination, i.e. CloudBacko Drive. Click Next to continue.
-
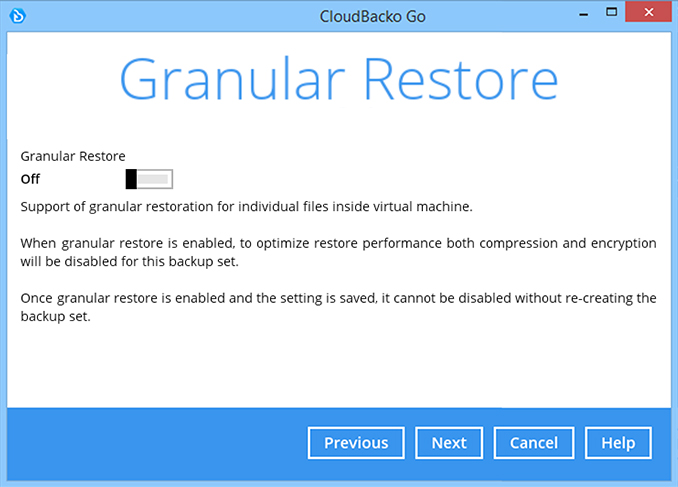
Use the default setting (off) for Granular Restore. Click Next to continue.
-
Use the default Encryption setting. Click Next to continue.

-
Click Confirm to continue.

-
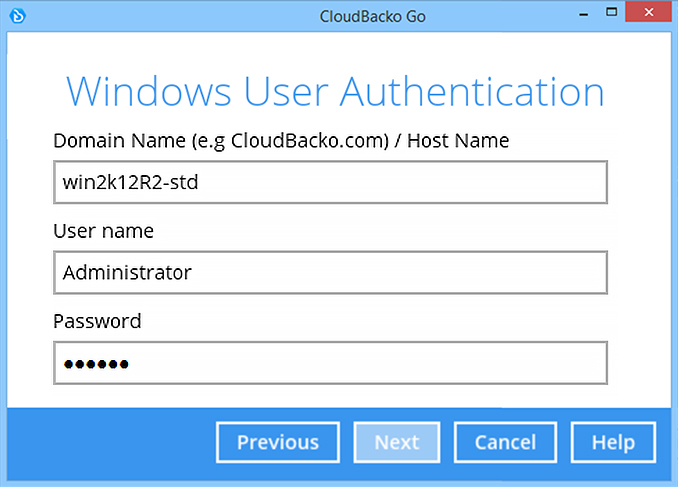
Enter the Windows login password. Click Next to continue.
-
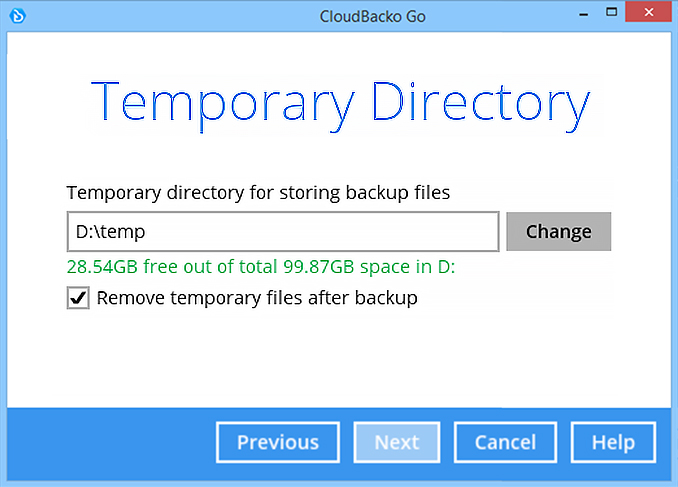
Select the temporary directory. Click Next to continue.
-
Backup set is created.
Click on Backup now to start a backup job or wait for the automated backup to start.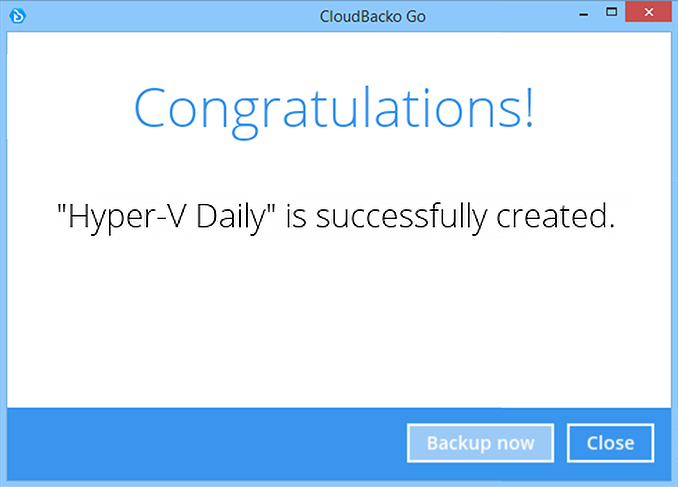


How to create a VMware ESXi backup
-
After login to Cloudbacko, click on the Backup Sets tile.

-
Click on the “+” to add new backup set.

-
Enter the name for example “VMware ESXi 7” and select backup set type VMware Backup. Click Next to continue.

-
Use the default setting for version. Enter the root password and host name for VMware host. As our VMware host is setup using default https and ssh port 443 / 22. Click Next to continue.

-
Select the virtual machines you wish to backup. Click Next to continue.
-
Create an automatic backup schedule, i.e. 20:00 daily and click Next to continue.

-
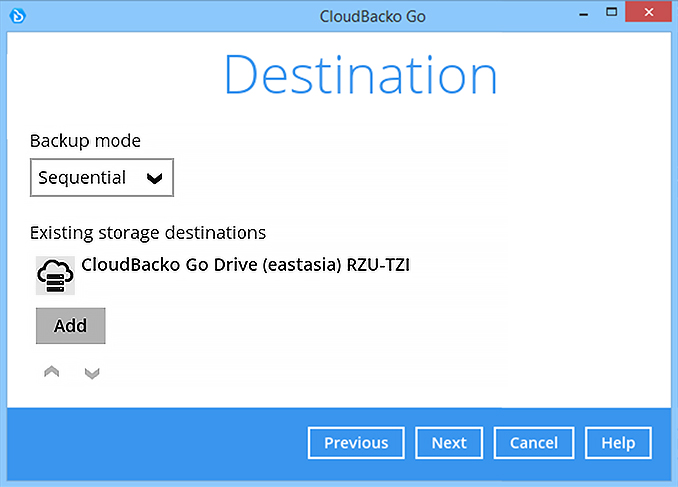
Select a storage destination, i.e. CloudBacko Drive. Click Next to continue.

-
Use the default setting (off) for Granular Restore. Click Next to continue.
-
Use the default Encryption setting. Click Next to continue.

-
Click Confirm to continue.

-
Backup set is created.
Click on Backup now to start a backup job or wait for the automated backup to start.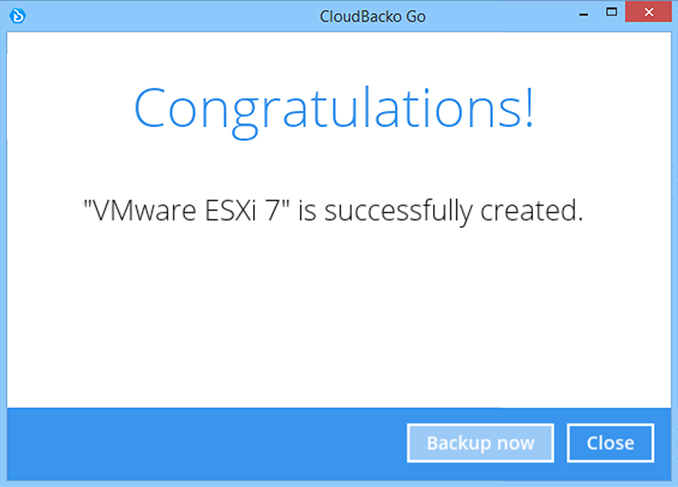


Choose the NAS device that you want to backup
- Synology
- QNAP
How to create a file backup on a Synology NAS
-
After login to Cloudbacko, click on the Backup Sets tile.

-
Click on the “+” to add new backup set.

-
Enter the backup set name, i.e. File Daily and click Next to continue.
-
Select some files/folders to backup on the Synology NAS device. Click Next to continue.
-
Create an automatic backup schedule, i.e. 20:00 daily and click Next to continue.
-
Select a storage destination, i.e. CloudBacko Drive. Click Next to continue.

-
Use default encryption settings. Click Next to continue.

-
Click Confirm to continue.
-
Click on Backup now to start a backup job or wait for the automated backup to start.


How to create a file backup on a QNAP NAS
-
After login to Cloudbacko, click on the Backup Sets tile.
-
Click on the “+” to add new backup set.

-
Enter the backup set name, i.e. File Daily and click Next to continue.
-
Select some files/folders to backup on the QNAP NAS device. Click Next to continue.
-
Create an automatic backup schedule, i.e. 20:00 daily and click Next to continue.

-
Select a storage destination, i.e. CloudBacko Drive. Click Next to continue.

-
Use default encryption settings. Click Next to continue.

-
Click Confirm to continue.
-
Click on Backup now to start a backup job or wait for the automated backup to start.


Choose the database that you want to backup
- Microsoft SQL Server
- Oracle
- MariaDB
- MySQL
Choose the Microsoft SQL Server backup mode
- VSS
- ODBC
How to create a Microsoft SQL Server (VSS) backup
-
After login to Cloudbacko, click on the Backup Sets tile.

-
Click on the “+” to add new backup set.

-
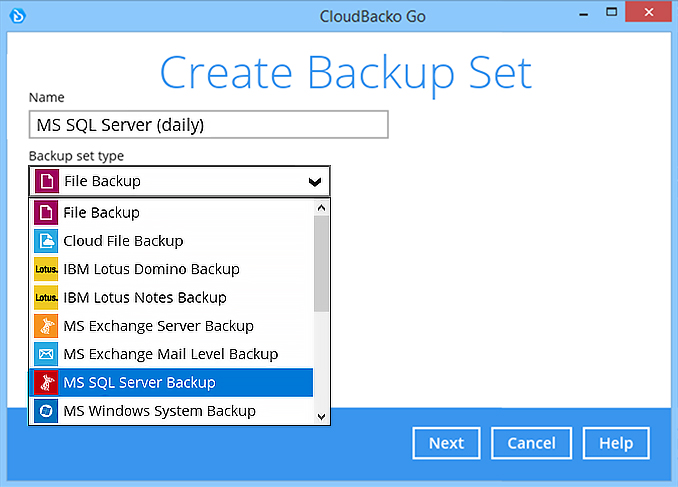
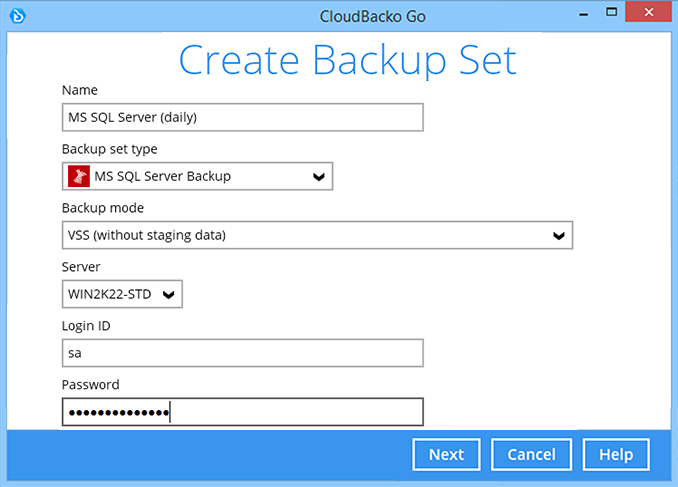
Enter the backup set name, i.e. MS SQL Server (daily) and select backup set type MS SQL Server Backup. Click Next to continue.
-
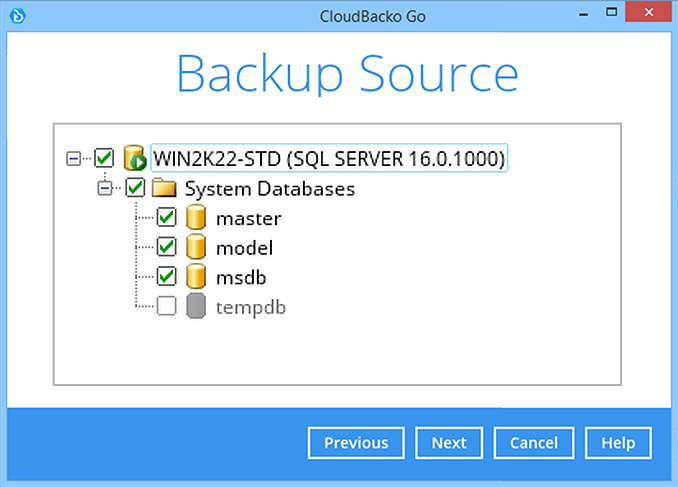
Select the Backup mode, i.e. VSS, then enter the MS SQL Server login details. Click Next to continue.
-
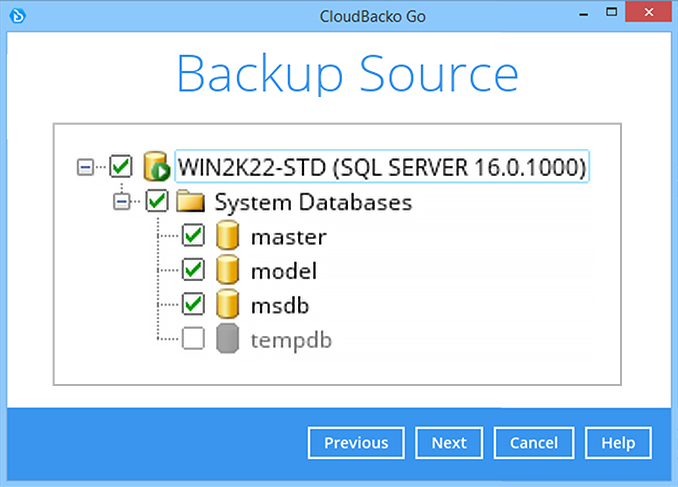
Select the databases you wish to backup. Click Next to continue.
-
Create an automatic backup schedule, i.e. 23:00 daily. Click Next to continue.

-
Select a storage destination, i.e. CloudBacko Drive. Click Next to continue.

-
Use the default Encryption setting. Click Next to continue.

-
Click Confirm to continue.

-
Enter the administrator credentials and click Next to continue.

-
Backup set is created.
Click on Backup now to start a backup job or wait for the automated backup to start.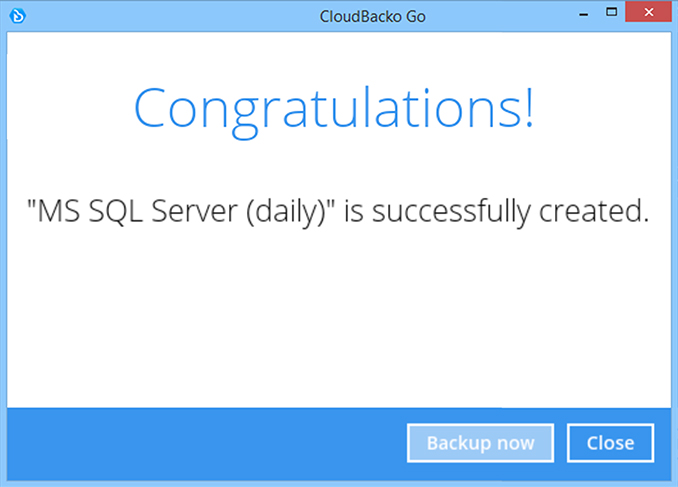


How to create a Microsoft SQL Server (ODBC) backup
-
After login to Cloudbacko, click on the Backup Sets tile.

-
Click on the “+” to add new backup set.

-
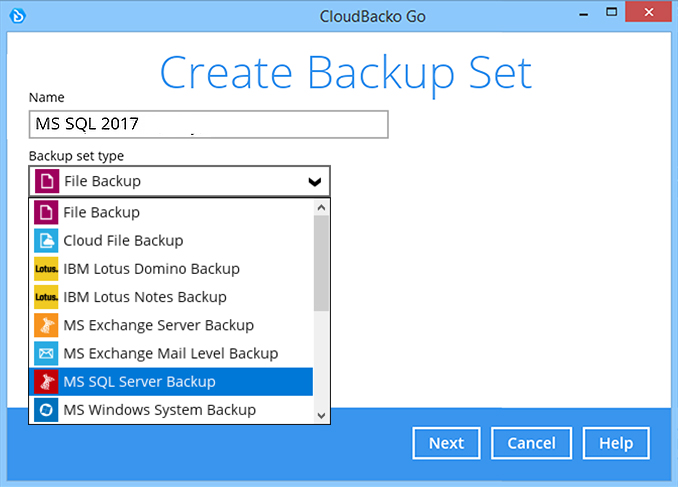
Enter the backup name, i.e. "MS SQL 2017" and select backup set type MS SQL Server Backup. Click Next to continue.
-
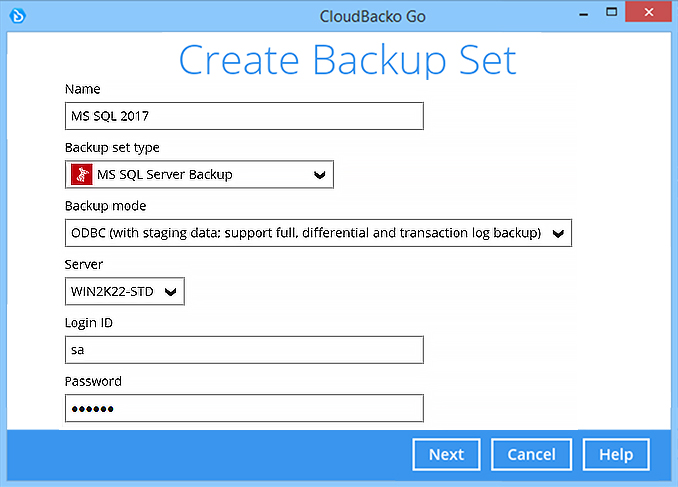
Select the backup mode, i.e. ODBC. Then enter the MS SQL Server login details. Click Next to continue.
-
Select the databases you wish to backup. Click Next to continue.
-
Create an automatic backup schedule, i.e. Full database backup every Saturday at 23:00, daily transaction log backups at 20:00. Click Next to continue.

-
Select a storage destination, i.e. CloudBacko Drive. Click Next to continue.

-
Use the default Encryption setting. Click Next to continue.

-
Click Confirm to continue.

-
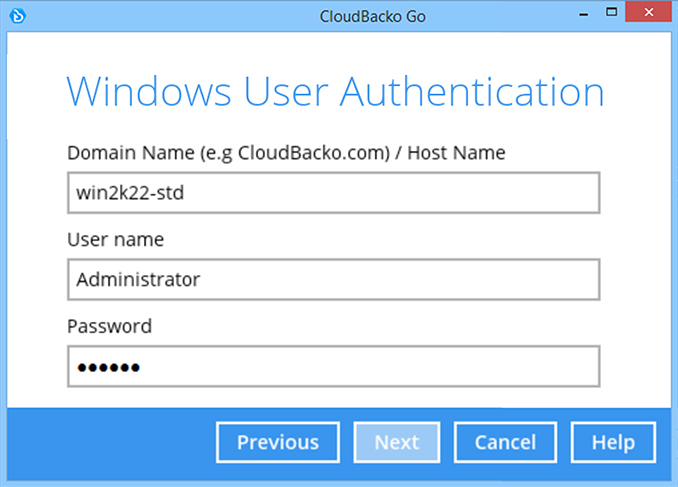
Enter Windows administrator login details. Click Next to continue.
-
Backup set is created.
Click on Backup now to start a backup job or wait for the automated backup to start.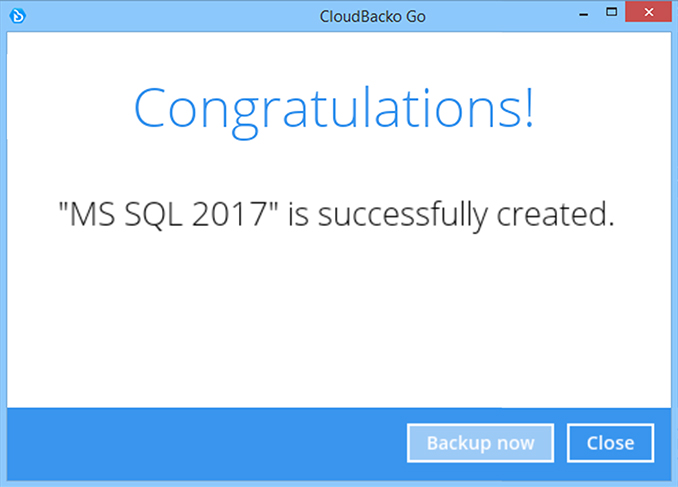


How to create an Oracle backup
-
After login to Cloudbacko, click on the Backup Sets tile.

-
Click on the “+” to add new backup set.

-
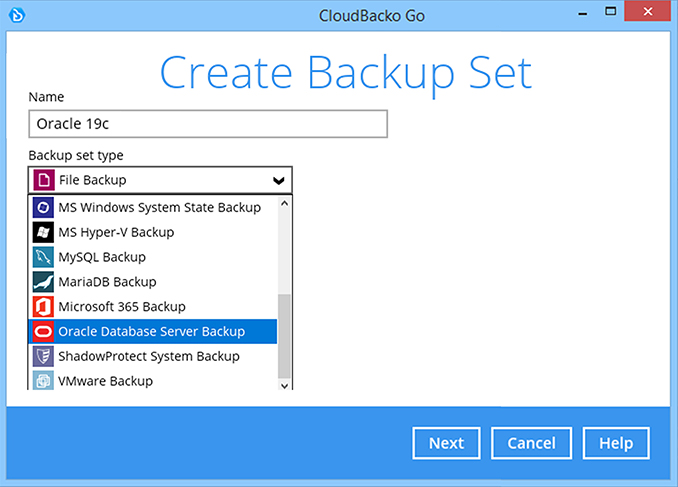
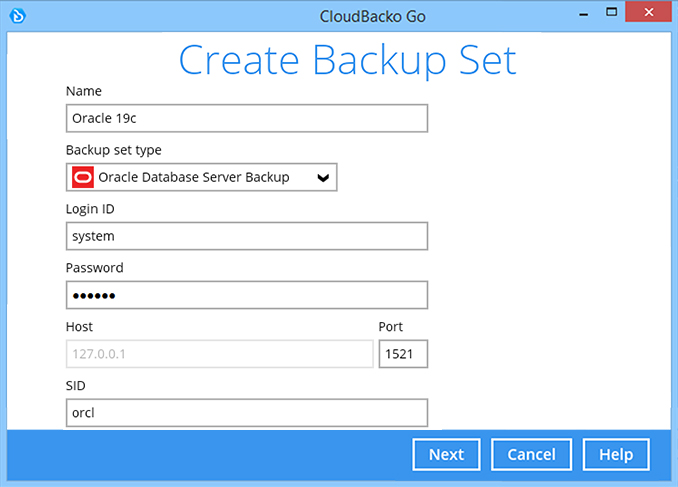
Enter the backup name, i.e. "Oracle 19c" and select backup set type Oracle Database Server Backup. Click Next to continue.
-
Enter the system user password, port number, and SID of your Oracle database instance. Click Next to continue.
-
Select the databases you wish to backup. Click Next to continue.

-
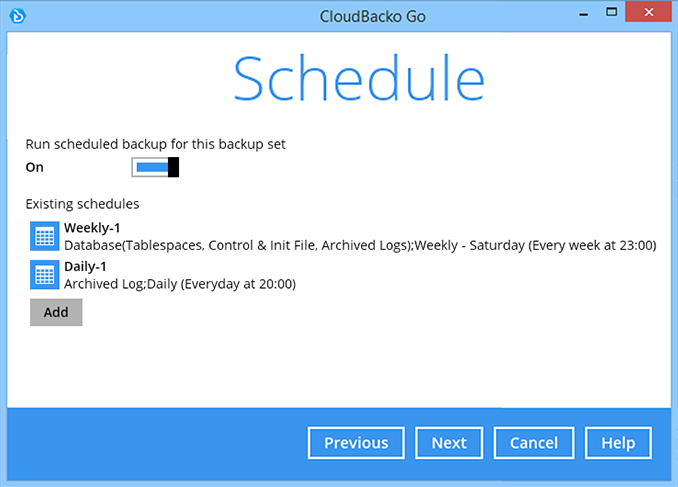
Create an automatic backup schedule, i.e. Full database backup every Saturday at 23:00, daily Archive log backups at 20:00. Click Next to continue.
-
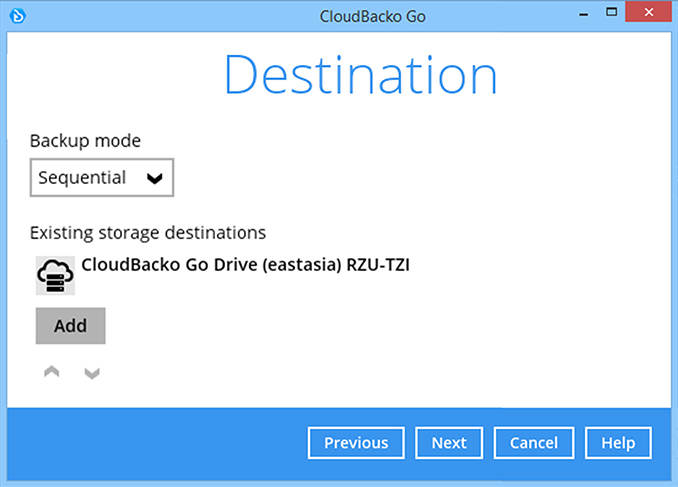
Select a storage destination, i.e. CloudBacko Drive. Click Next to continue.
-
Use the default Encryption setting. Click Next to continue.

-
Click Confirm to continue.
-
Backup set is created.
Click on Backup now to start a backup job or wait for the automated backup to start.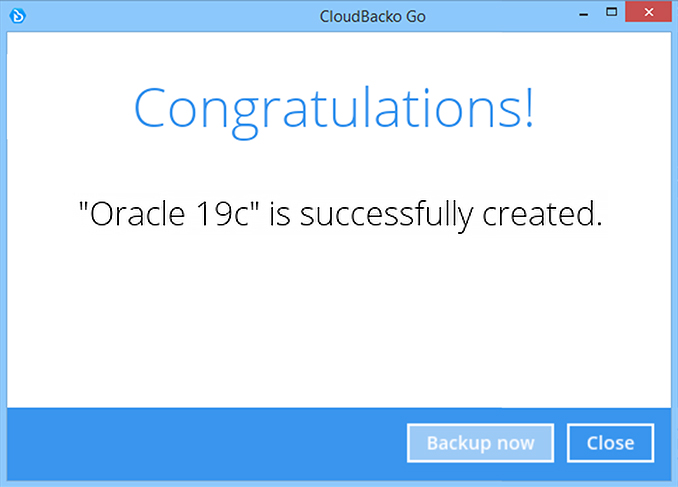


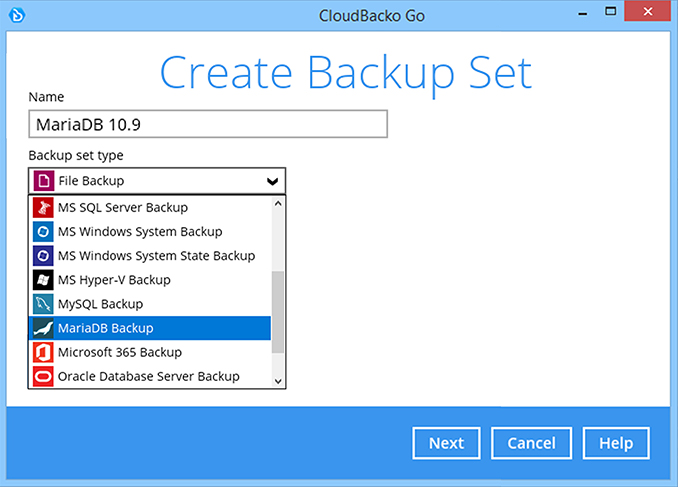
How to create a MariaDB backup
-
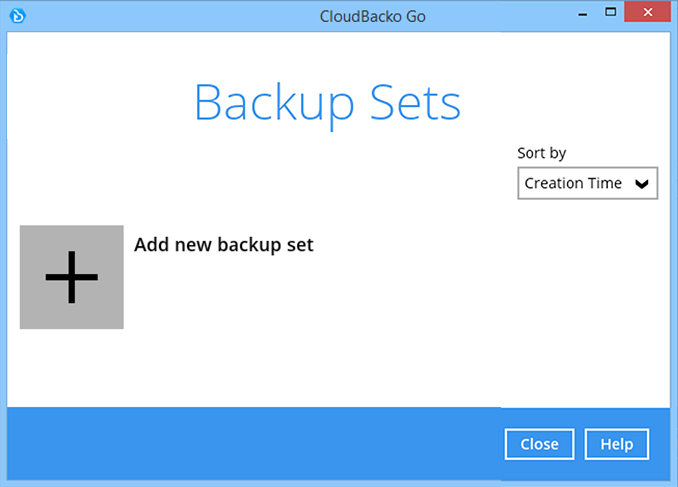
After login to Cloudbacko, click on the Backup Sets tile.

-
Click on the “+” to add new backup set.

-
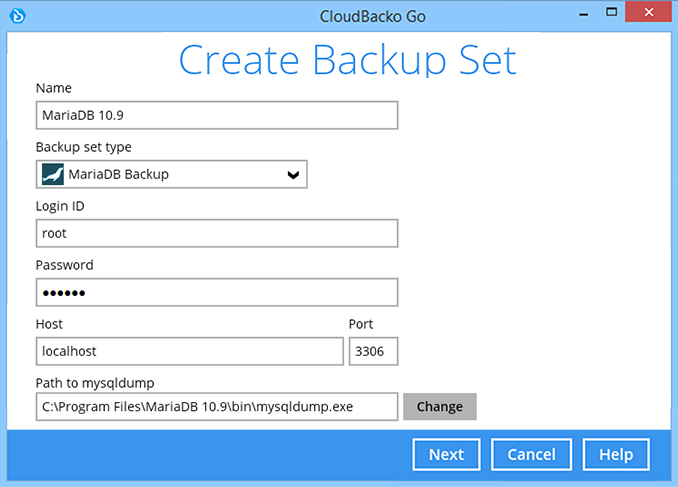
Enter the backup name, i.e. "MariaDB 10.9" and select backup set type MariaDB Backup. Click Next to continue.
-
Enter the root password, host, port number, and path of mysqldump.exe for your MariaDB database. Click Next to continue.
-
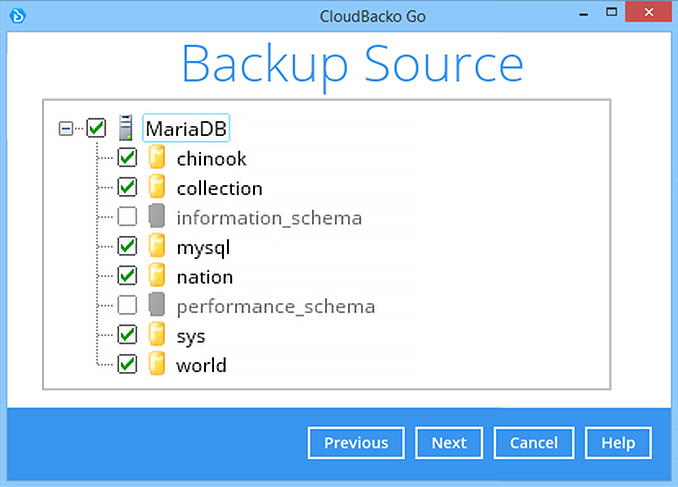
Select the databases you wish to backup. Click Next to continue.
-
Create an automatic backup schedule, i.e. 20:00 daily and click Next to continue.

-
Select a storage destination, i.e. CloudBacko Drive. Click Next to continue.

-
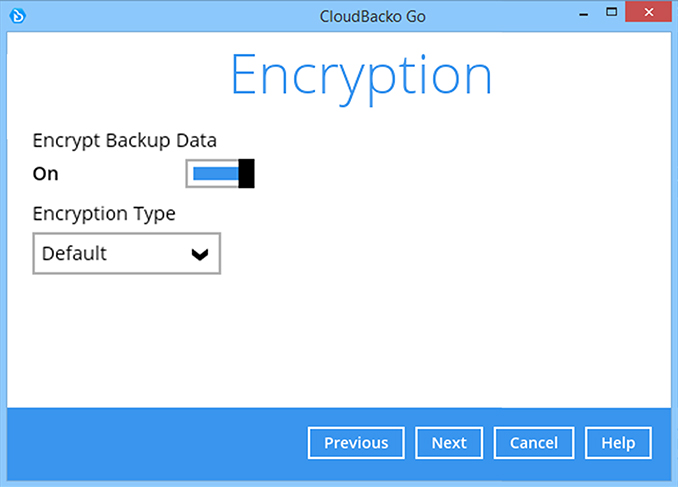
Use the default Encryption setting. Click Next to continue.
-
Click Confirm to continue.

-
Backup set is created.
Click on Backup now to start a backup job or wait for the automated backup to start.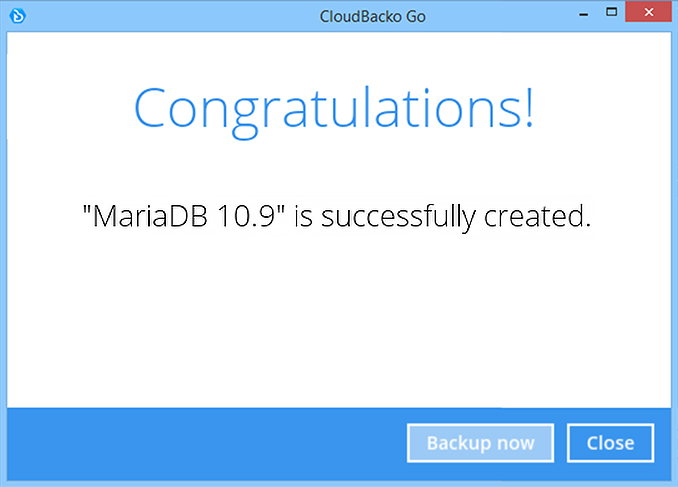


How to create a MySQL backup
-
After login to Cloudbacko, click on the Backup Sets tile.

-
Click on the “+” to add new backup set.
-
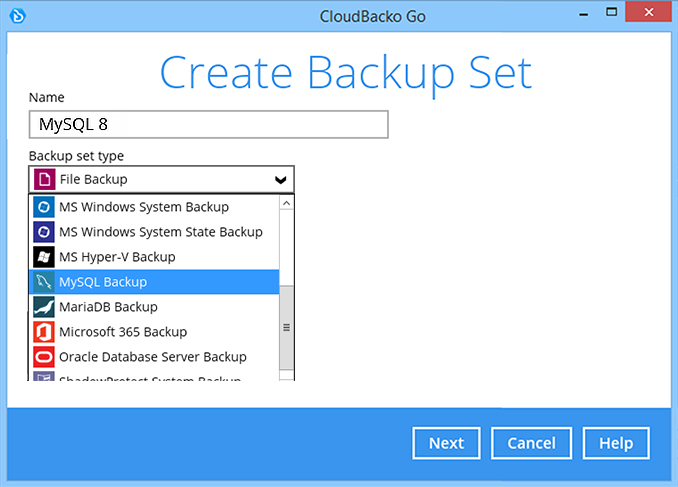
Enter the backup name, i.e. "MySQL 8" and select backup set type MySQL Backup. Click Next to continue.
-
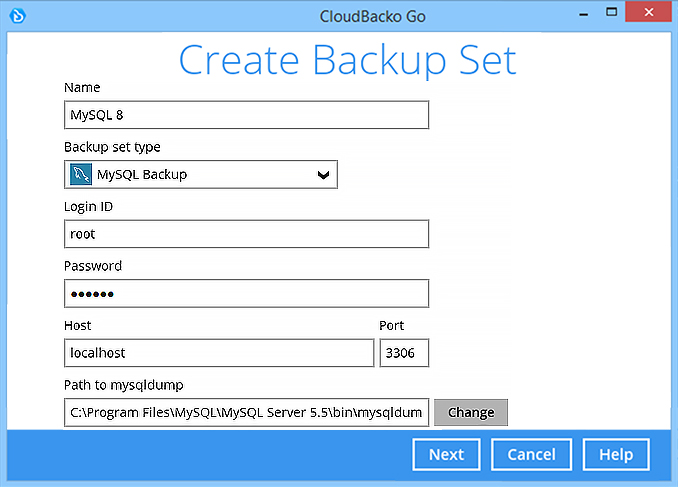
Enter the root password, host, port number, and path of mysqldump.exe for your MySQL database. Click Next to continue.
-
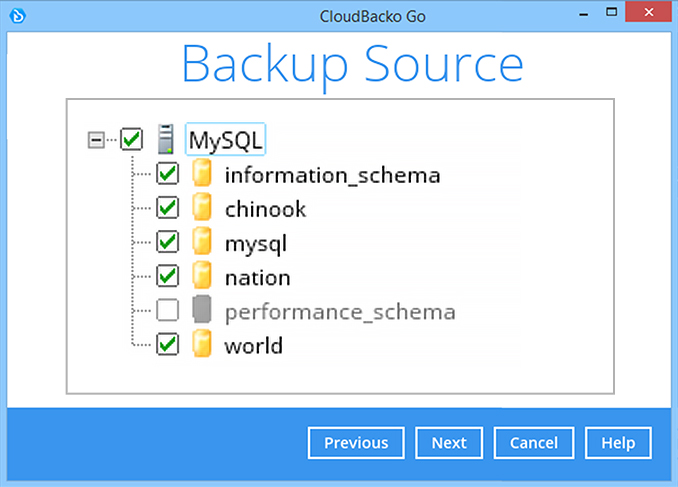
Select the databases you wish to backup. Click Next to continue.
-
Create an automatic backup schedule, i.e. 20:00 daily and click Next to continue.

-
Select a storage destination, i.e. CloudBacko Drive. Click Next to continue.

-
Use the default Encryption setting. Click Next to continue.

-
Click Confirm to continue.

-
Backup set is created.
Click on Backup now to start a backup job or wait for the automated backup to start.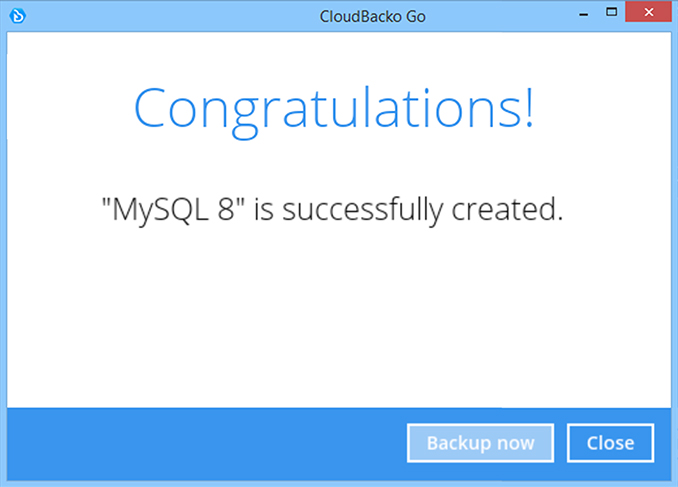


Choose the Microsoft Exchange backup type that you want to perform
- Database
- Individual Mail
How to create a Microsoft Exchange Server (database) backup
-
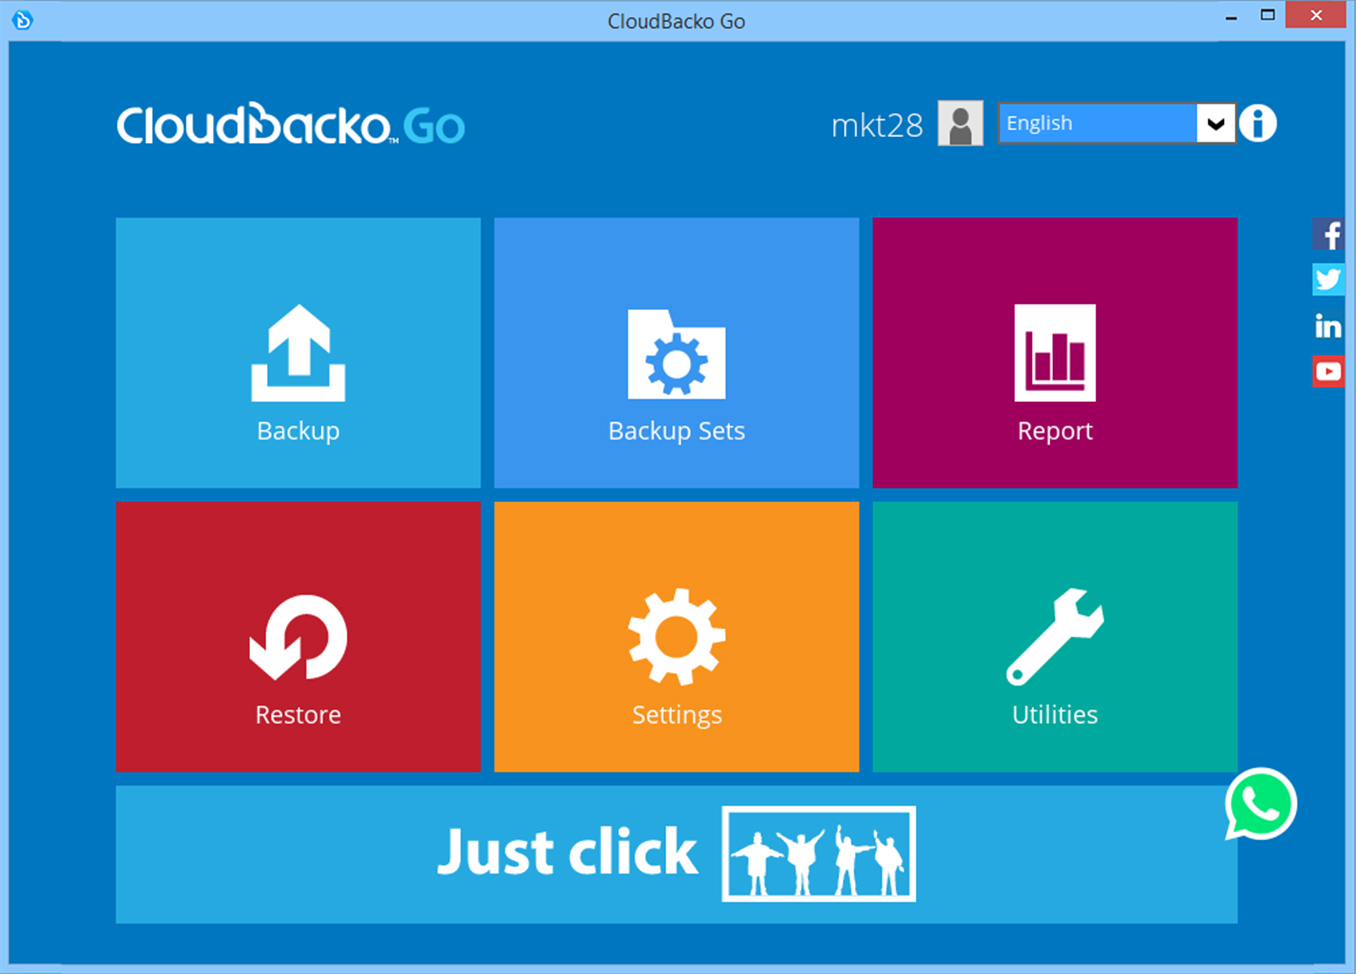
After login to Cloudbacko Go, click on the Backup Sets tile.

-
Click on the + to add new backup set

-
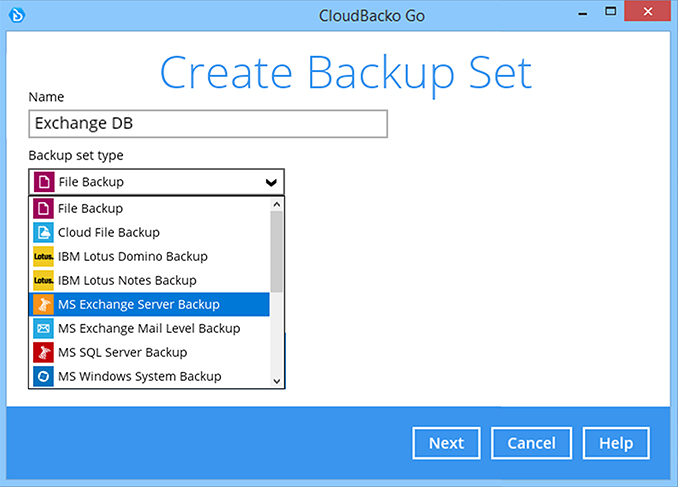
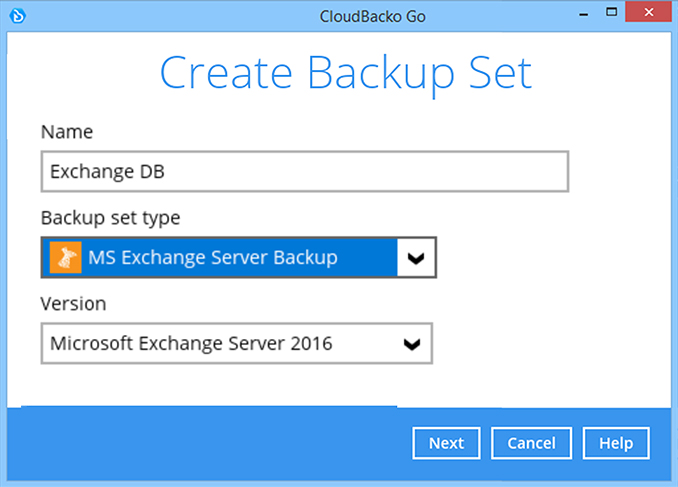
Enter the backup name, i.e. "Exchange DB". Select backup set type MS Exchange Server Backup.
-
Cloudbacko Go will automatically detect the Microsoft Exchange Server version. Click Next to continue.
-
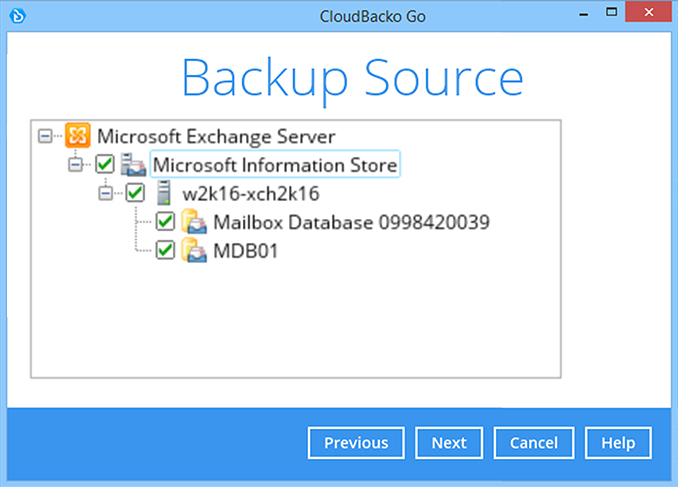
Select the databases you wish to backup. Click Next to continue.
-
Create an automatic backup schedule, i.e. 20:00 daily and click Next to continue.

-
Select a storage destination, i.e. CloudBacko Drive. Click Next to continue.

-
Use the default Encryption setting and click Next to continue.

-
Click Confirm to continue.

-
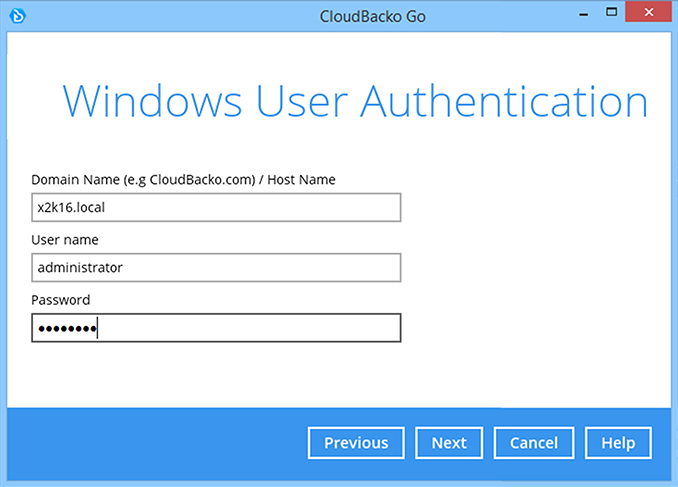
Enter the Windows username and password. Click Next to continue.

-
Backup set is created.
Click Backup now to start a backup job or wait for the automated backup to start.


How to create a Microsoft Exchange Server (individual mail) backup
-
After login to Cloudbacko Go, click on the Backup Sets tile.
-
Click on the “+” to add new backup set

-
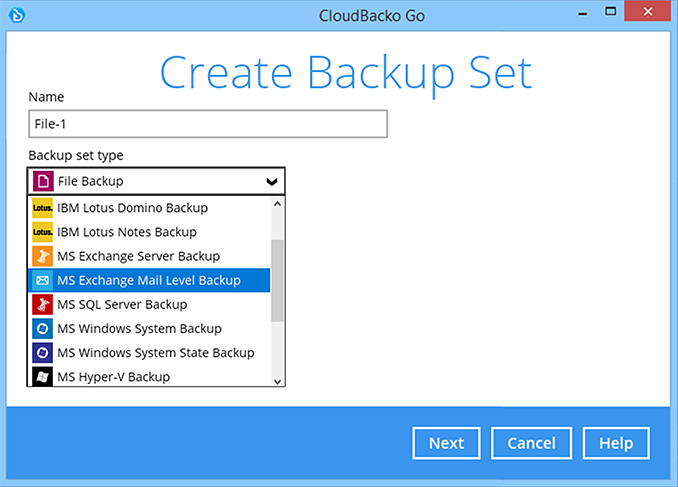
Enter the backup name, i.e. "Exchange mailbox". Select backup set type MS Exchange Mail Level Backup.
-
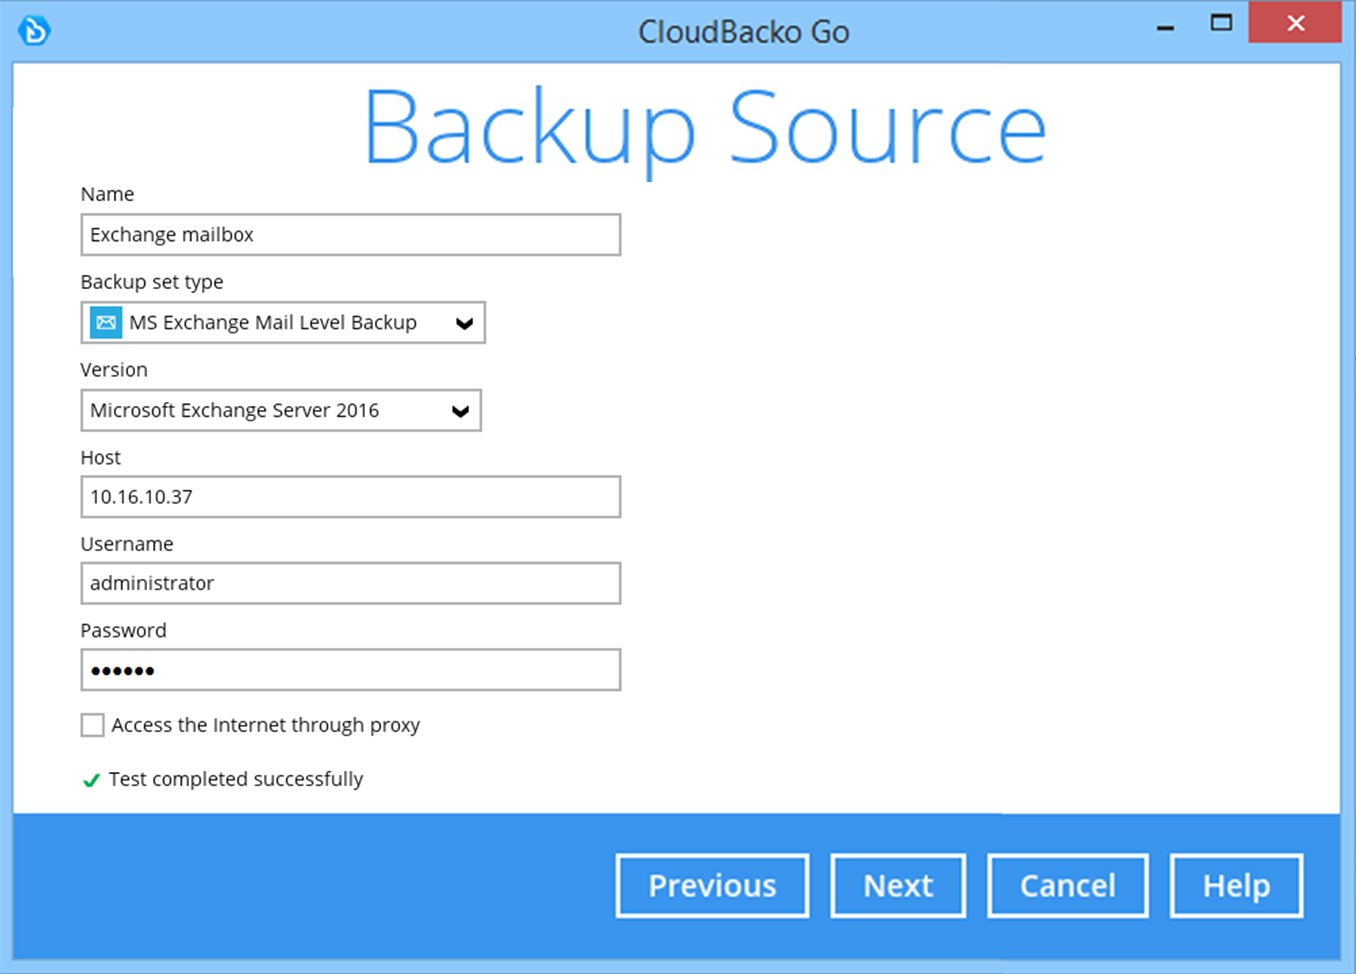
CloudBacko Go will automatically detect the MS Exchange version. Enter the MS Exchange server details; Host, username, and password. Click Test to continue.

-
After message Test is completed successfully is shown. Click Next to continue.
-
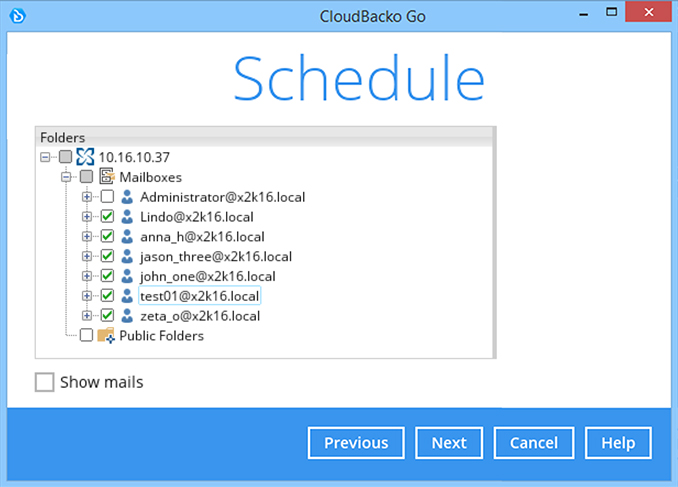
Select the mailboxes you wish to backup. Click Next to continue.
-
Create an automatic backup schedule, i.e. 20:00 daily and click Next to continue.

-
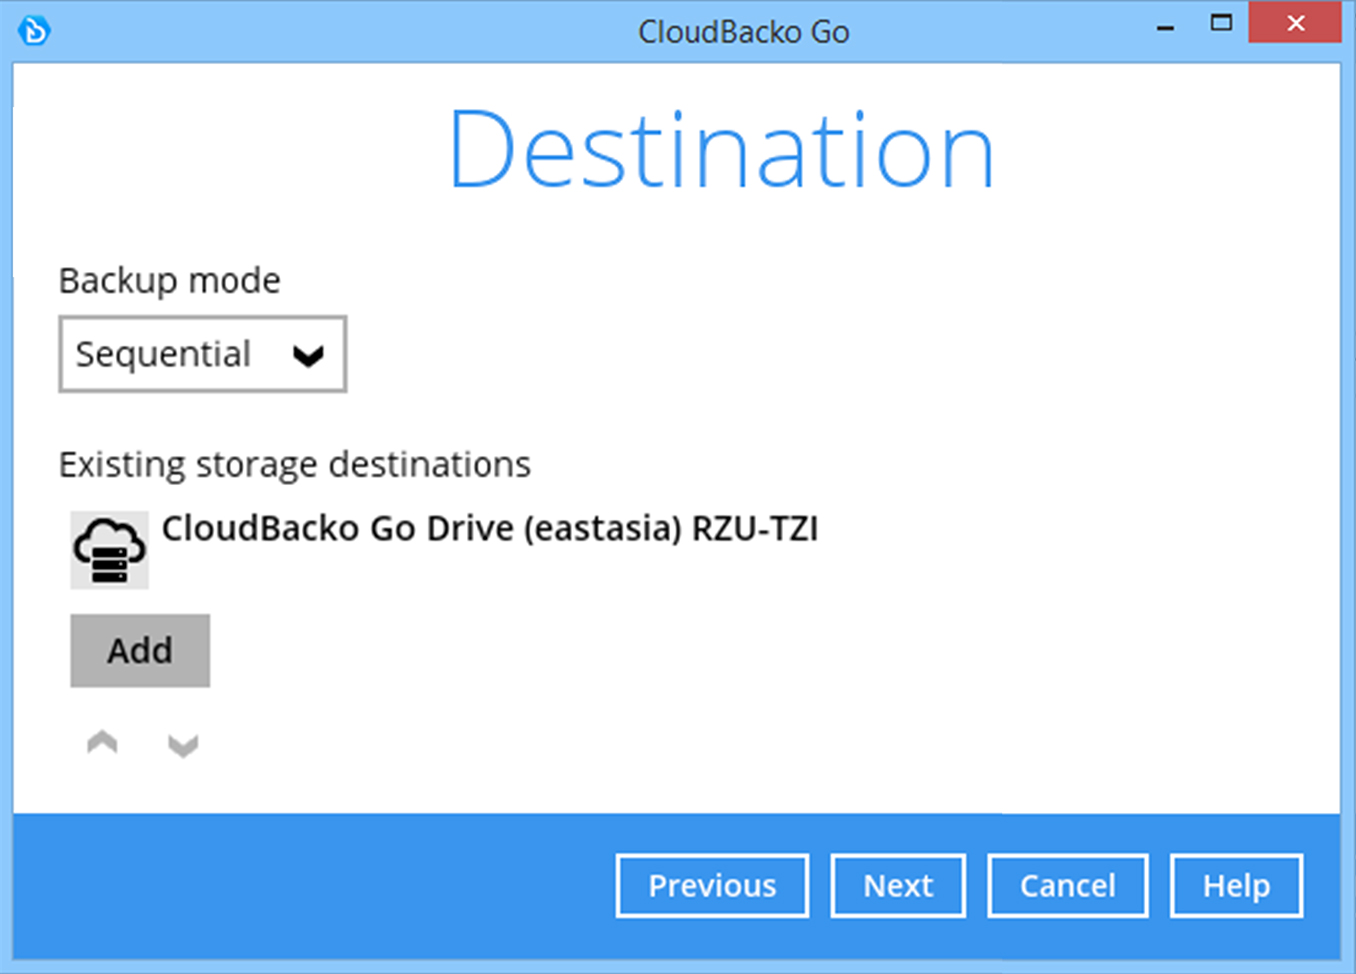
Select a storage destination, i.e. CloudBacko Drive. Click Next to continue.
-
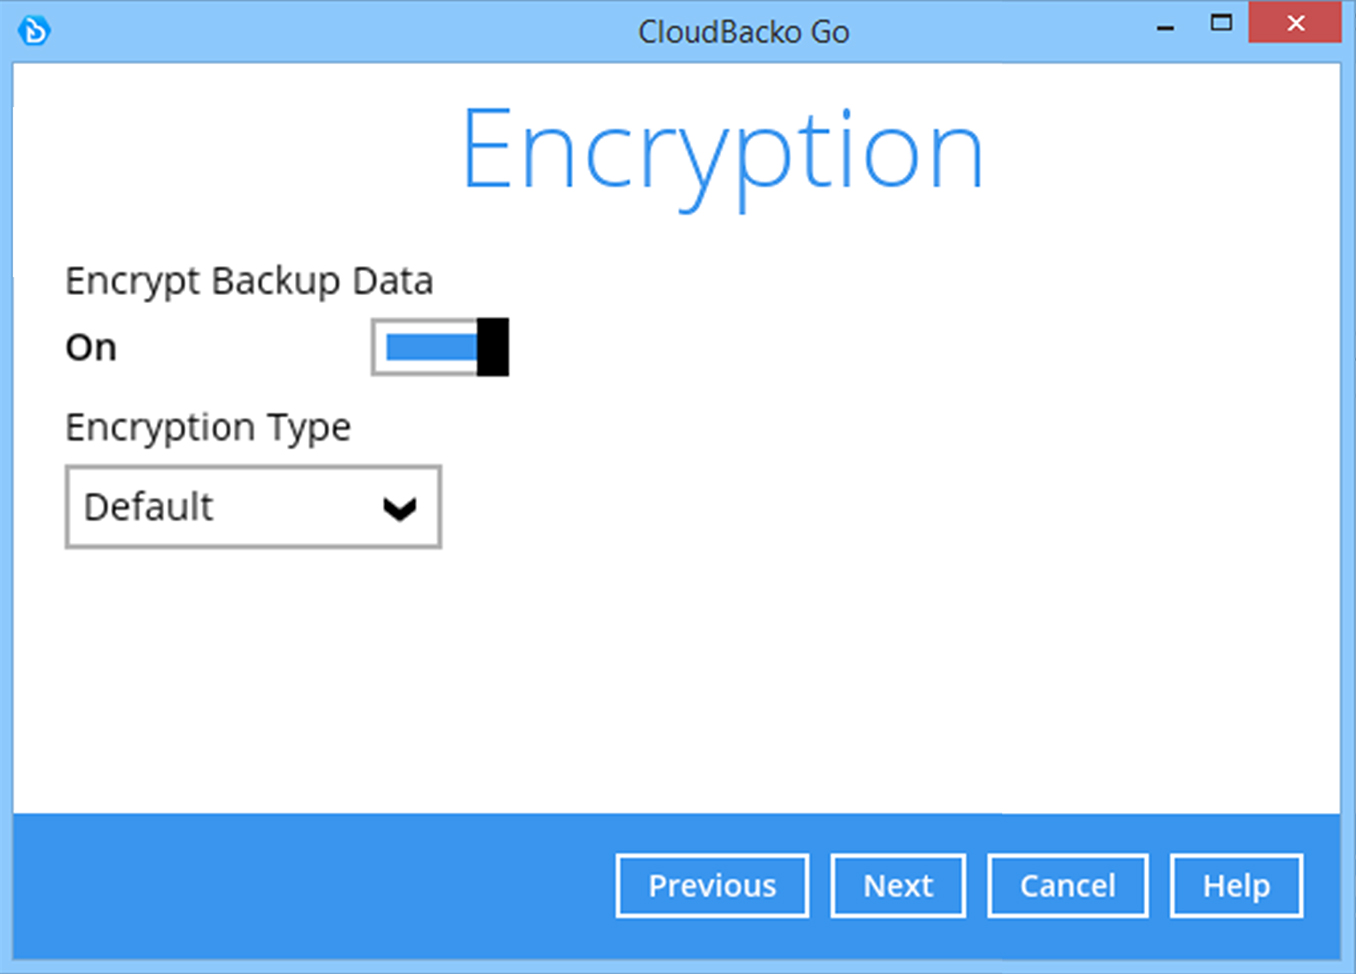
Use the default Encryption setting and click Next to continue.
-
Click Confirm to continue.

-
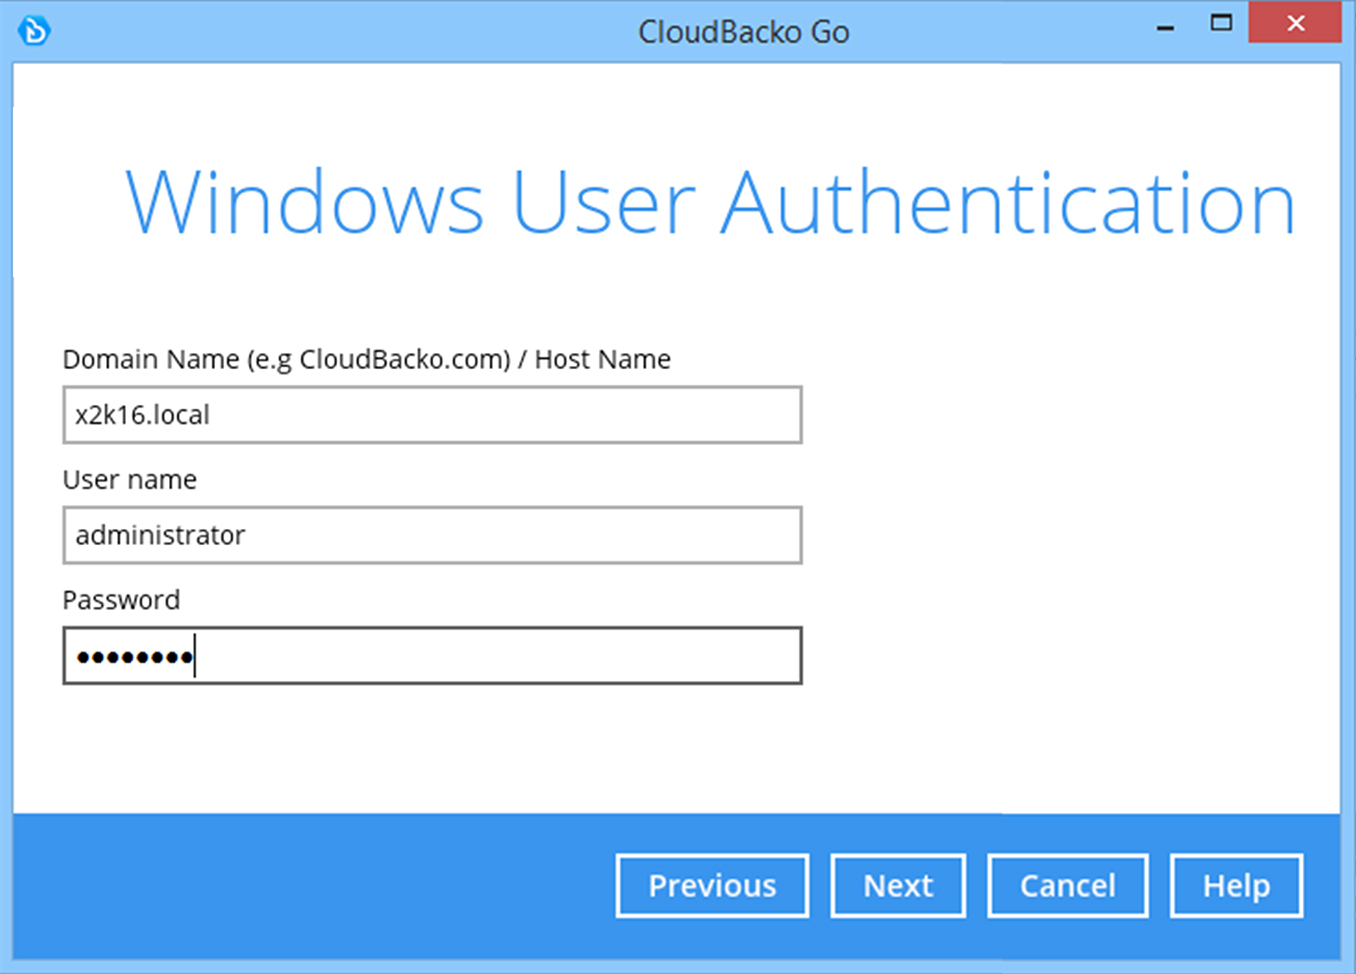
Enter Window administrator password. Click Next to continue.
-
Backup set is created.
Click on Backup now to start a backup job or wait for the automated backup to start.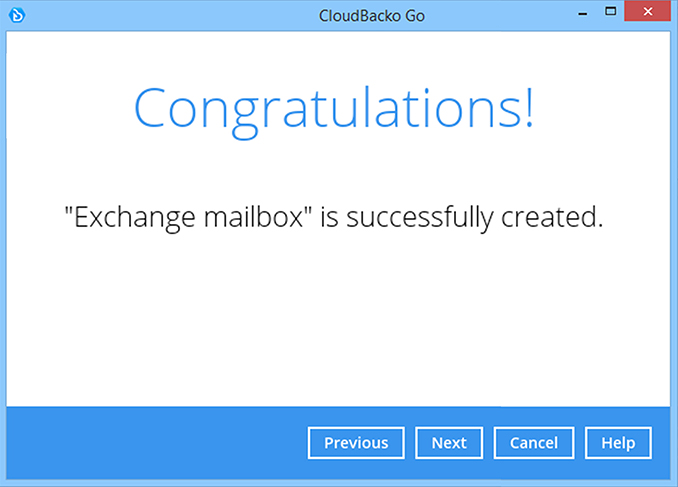


Choose the Windows backup type that you want to perform
- Complete System
- System State only
How to create a Microsoft System Backup
-
After login to Cloudbacko Go, click on the Backup Sets tile.

-
Click on the “+” to add new backup set

-
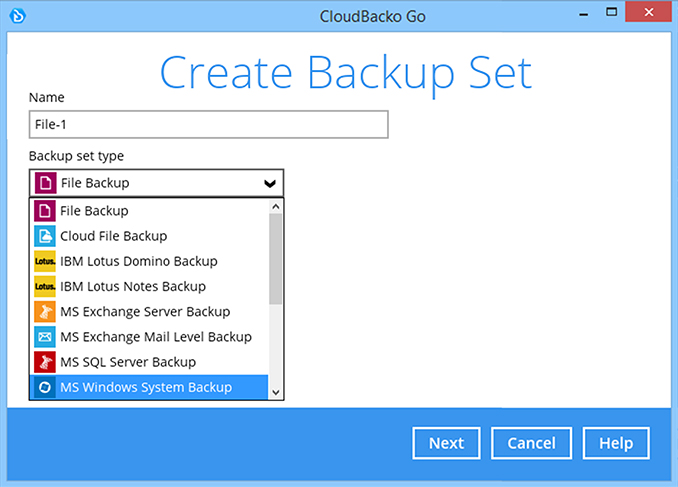
Enter the backup name, i.e. "Windows System". Select backup set type MS Windows System Backup.
-
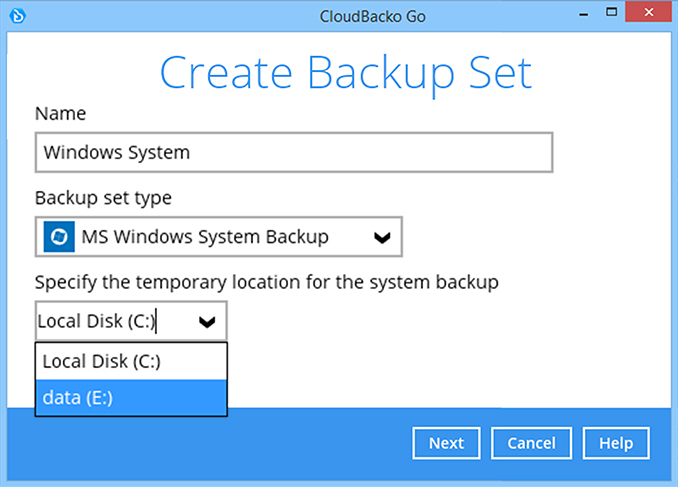
Select the temporary location for the system backup, for example F: drive. Click Next to continue.
-
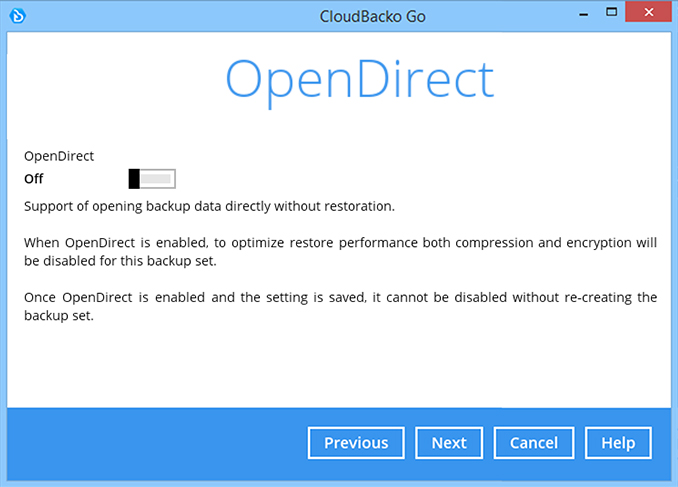
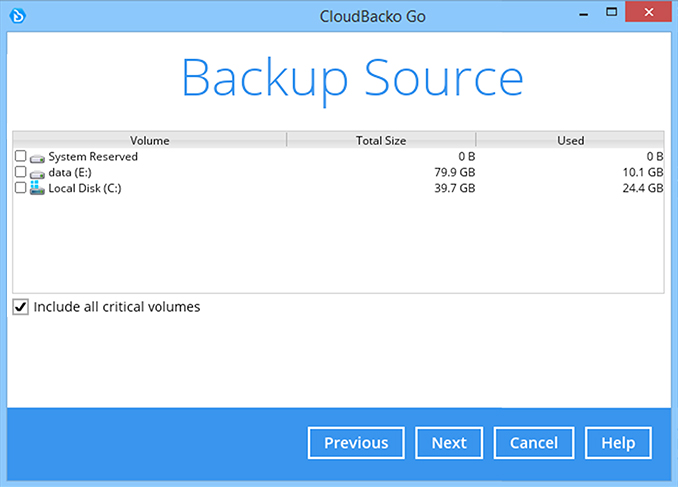
Select the disks you wish to backup, i.e. C: Drive. Include all critical volumes is selected by default. Click Next to continue.
-
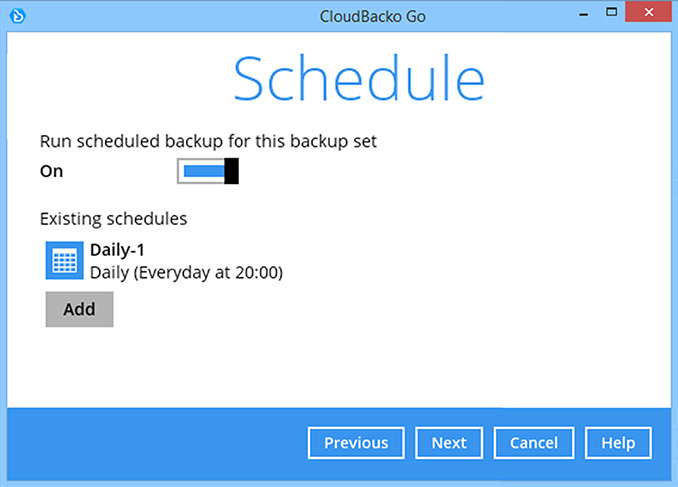
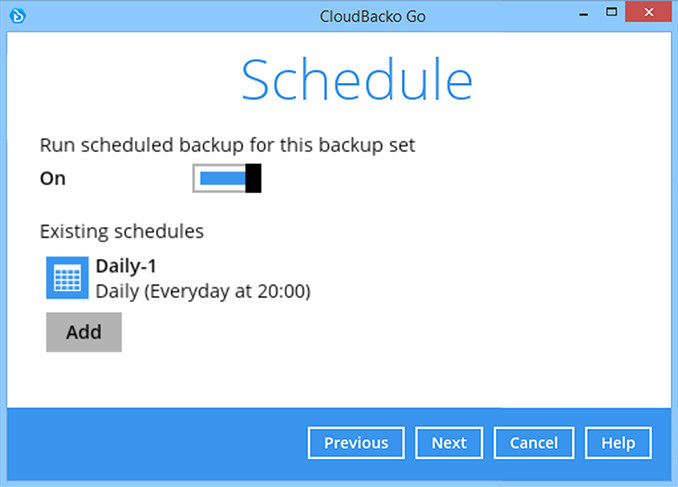
Create an automatic backup schedule, i.e. 20:00 daily and click Next to continue.

-
Select a storage destination, i.e. CloudBacko Drive. Click Next to continue.

-
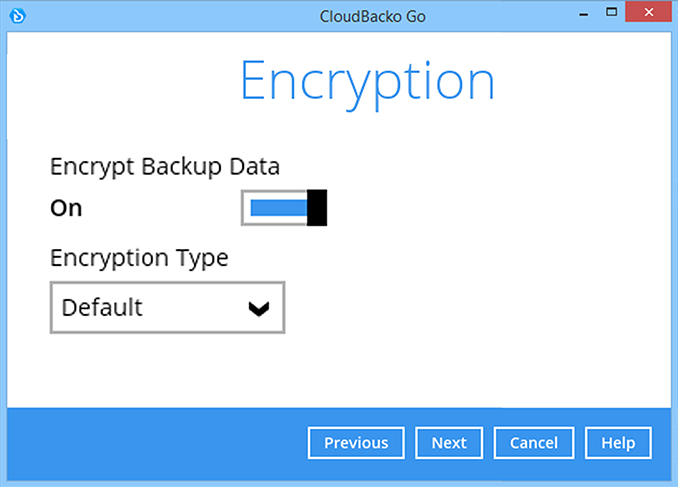
Use the default Encryption setting and click Next to continue.

-
Click Confirm to continue.

-
Backup set is created.
Click on Backup now to start a backup job or wait for the automated backup to start.


How to create a Microsoft System State Backup
-
After login to Cloudbacko Go, click on the Backup Sets tile.

-
Click on the “+” to add new backup set

-
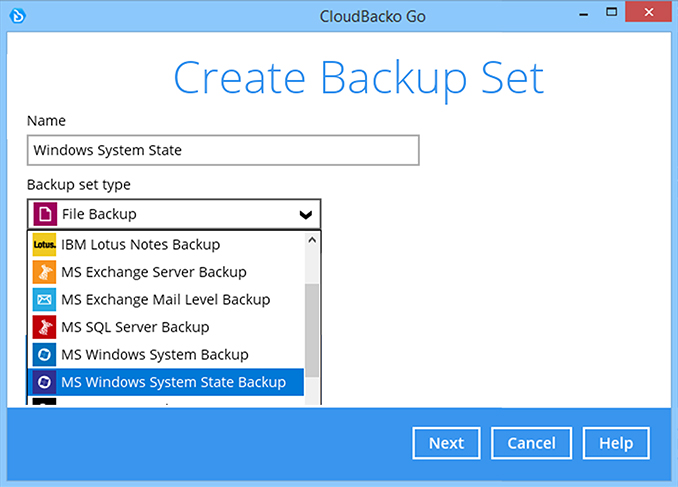
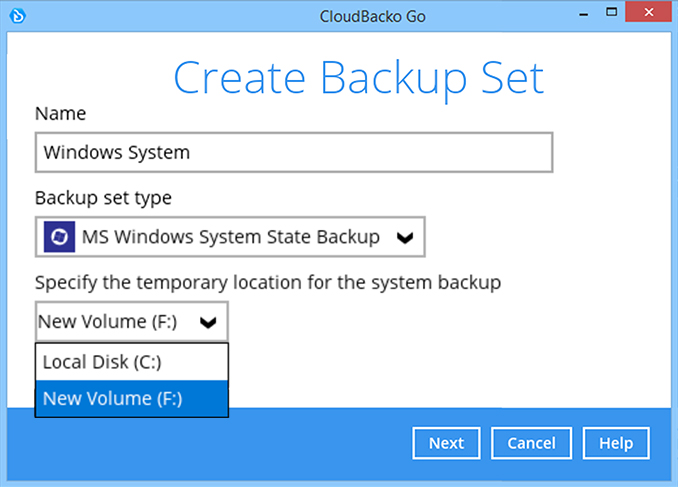
Enter the backup name, i.e. "Windows System State". Select backup set type MS Windows System State Backup.
-
Select the temporary location for the system backup, for example F: drive. Click Next to continue.
-
Create an automatic backup schedule, i.e. 20:00 daily and click Next to continue.
-
Select a storage destination, i.e. CloudBacko Drive. Click Next to continue.

-
Use the default Encryption setting and click Next to continue.
-
Click Confirm to continue.

-
Backup set is created.
Click on Backup now to start a backup job or wait for the automated backup to start.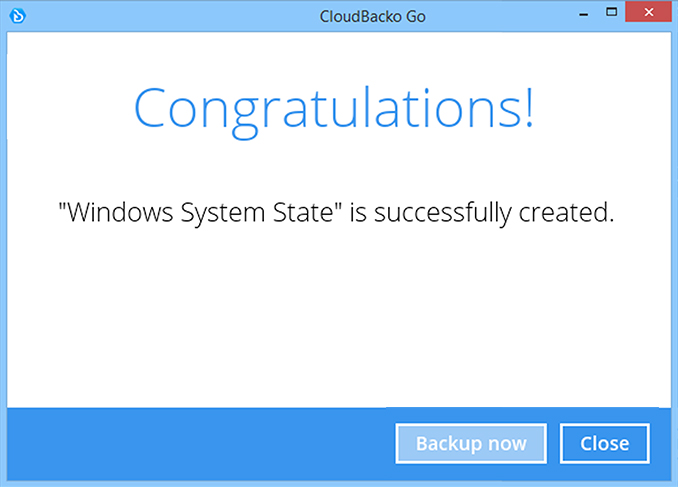


Choose the cloud storage that you want to backup
- Amazon S3
- OneDrive
- Google Drive
- Dropbox
How to create a Amazon S3 cloud file backup
-
After login to Cloudbacko, click on the Backup Sets tile.

-
Click on the “+” to add new backup set.

-
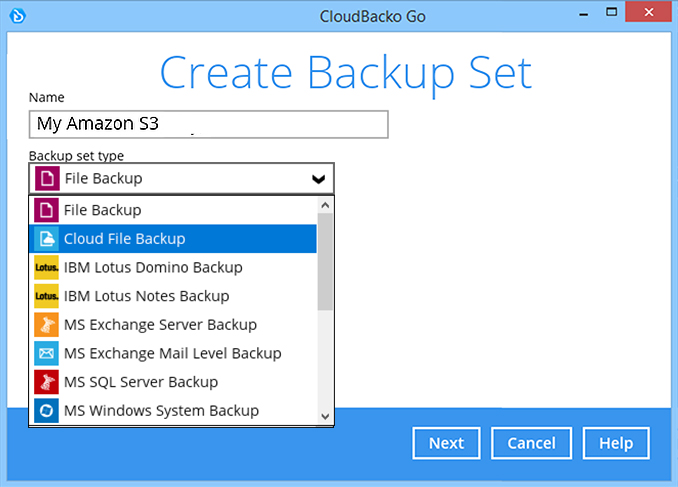
Enter the backup name, i.e. "My Amazon S3" and select backup set type Cloud File Backup. Click Next to continue.
-
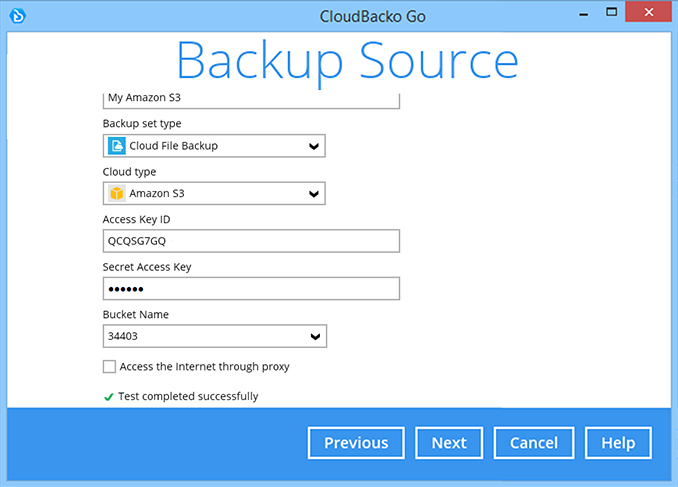
Select the Cloud type, i.e. Amazon S3. Enter your Access Key ID and Secret Access Key. Click Test or Next to continue.

-
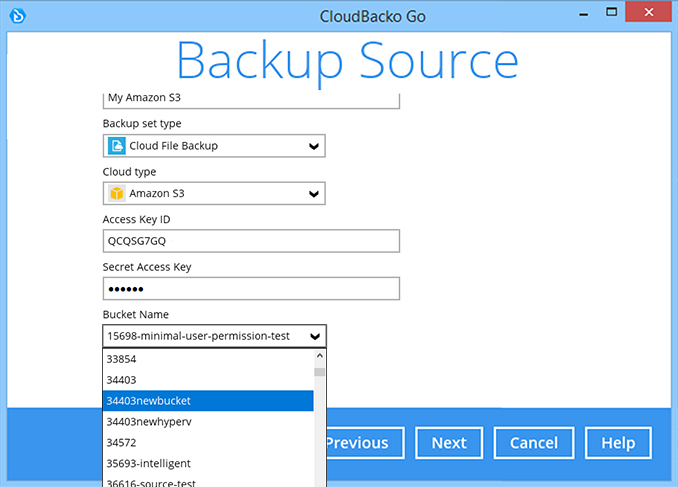
After "Test completed successfully" message is shown. Select the "Bucket Name" you wish to backup. Click Next to continue.
-
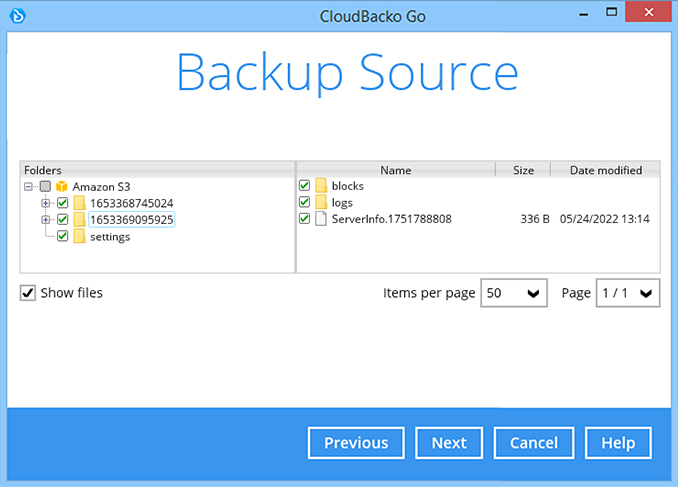
Select the files/folders in the Amazon S3 bucket you wish to backup. Click Next to continue.
-
Create an automatic backup schedule, i.e. 20:00 daily and click Next to continue.

-
Select a storage destination, i.e. CloudBacko Drive. Click Next to continue.

-
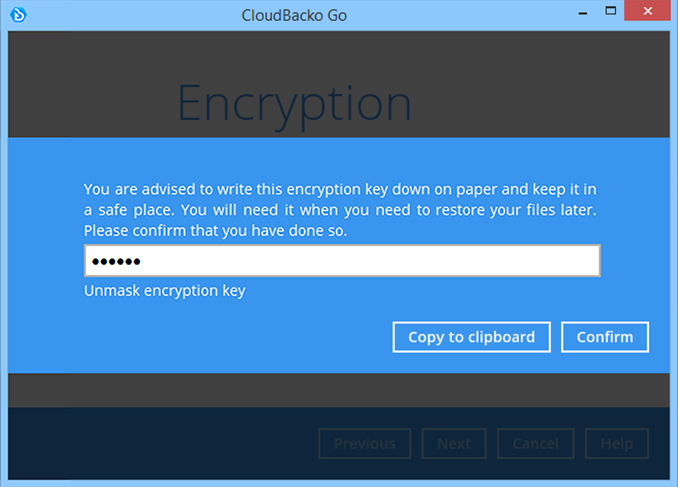
Use the default Encryption setting. Click Next to continue.

-
Click Confirm to continue.
-
Backup set is created.
Click on Backup now to start a backup job or wait for the automated backup to start.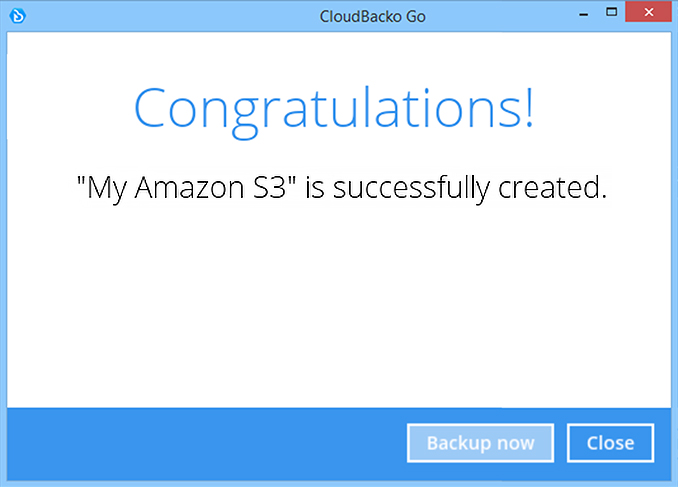


How to create a OneDrive cloud file backup
-
After login to Cloudbacko, click on the Backup Sets tile.

-
Click on the “+” to add new backup set.

-
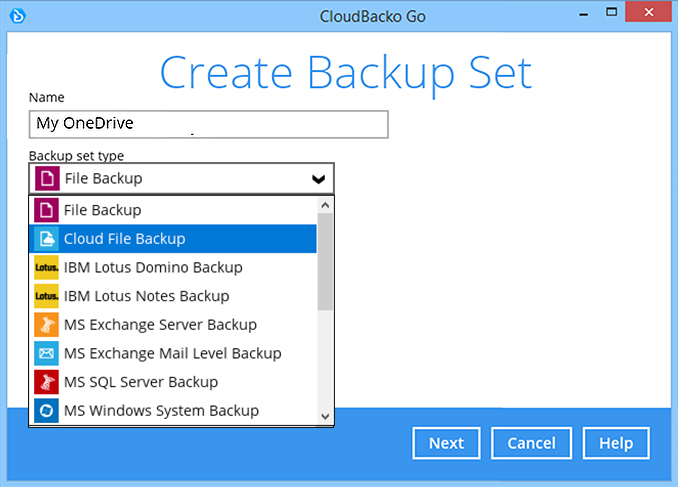
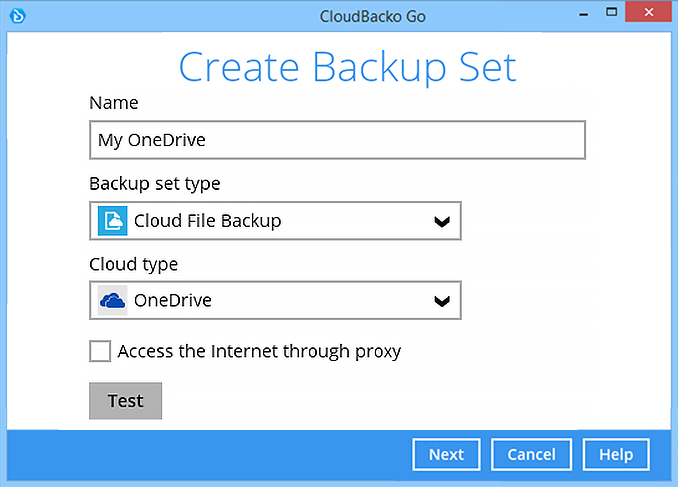
Enter the backup name, i.e. "My OneDrive" and select backup set type Cloud File Backup. Click Next to continue.
-
Select the Cloud type, i.e. OneDrive. Click Test to continue.
-
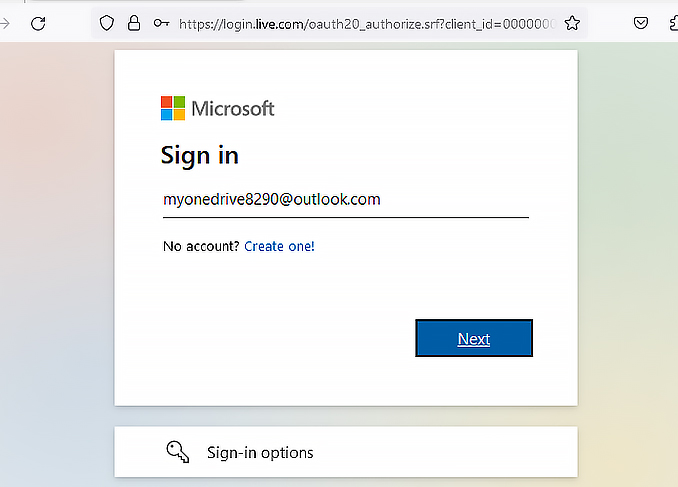
Your web browser will launch. Enter your OneDrive account name. Click Next to continue.
-
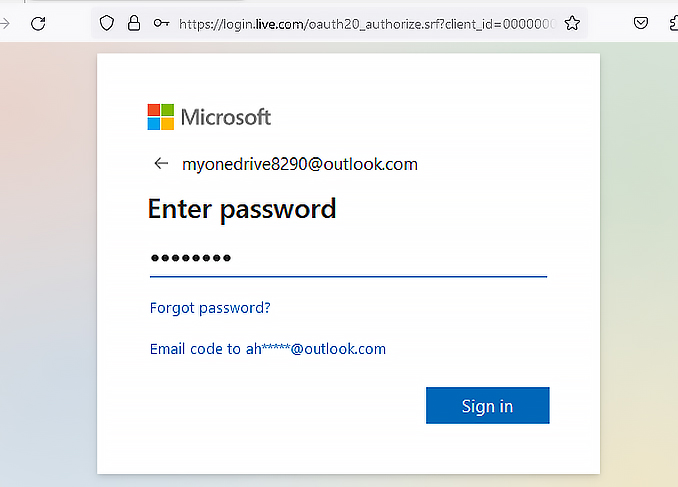
Enter your OneDrive password. Click Sign in to continue.
-
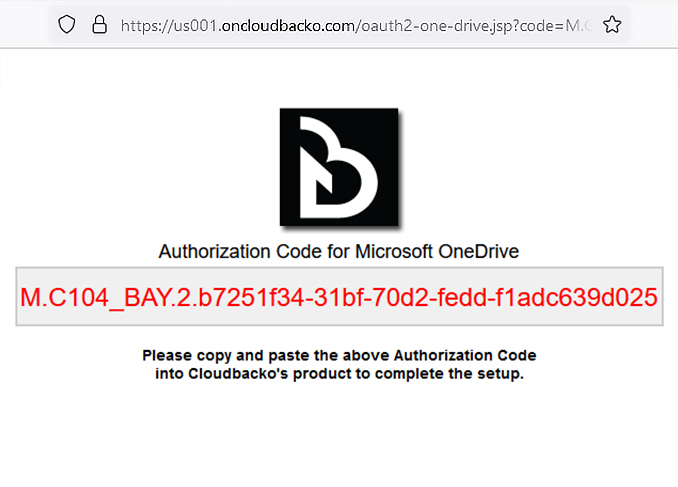
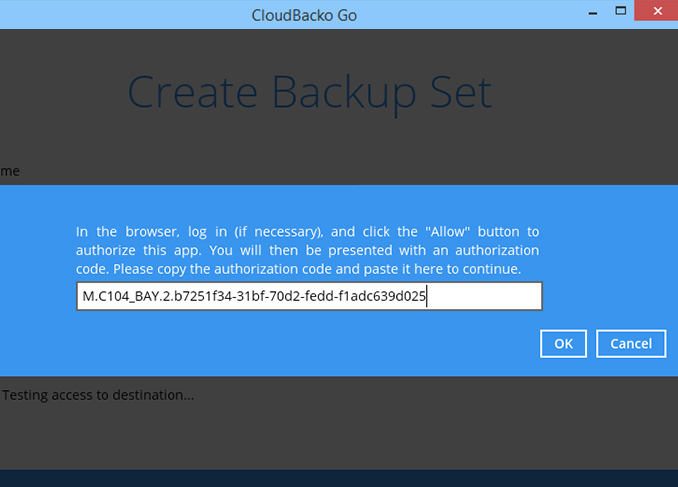
When the Authorization Code for Microsoft OneDrive is displayed, copy the code.
-
Paste the authorization code back to CloudBacko Go. Click OK to continue.
-
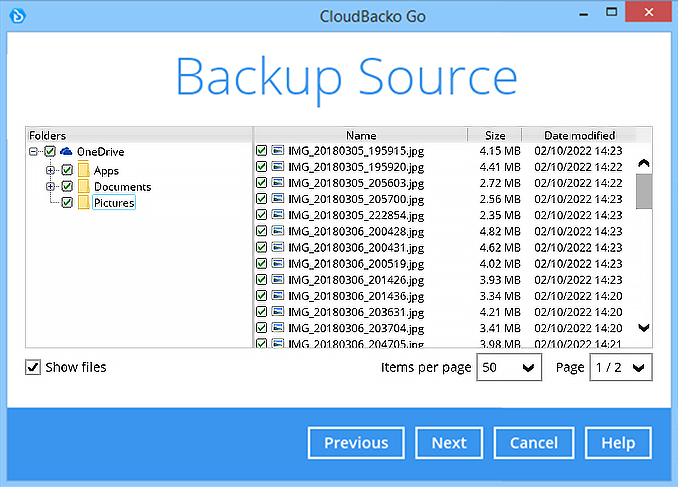
Select the folders in your OneDrive account you wish to backup, i.e. Apps, Documents, Pictures. Click Next to continue.
-
Create an automatic backup schedule, i.e. 20:00 daily and click Next to continue.

-
Select a storage destination, i.e. CloudBacko Drive. Click Next to continue.

-
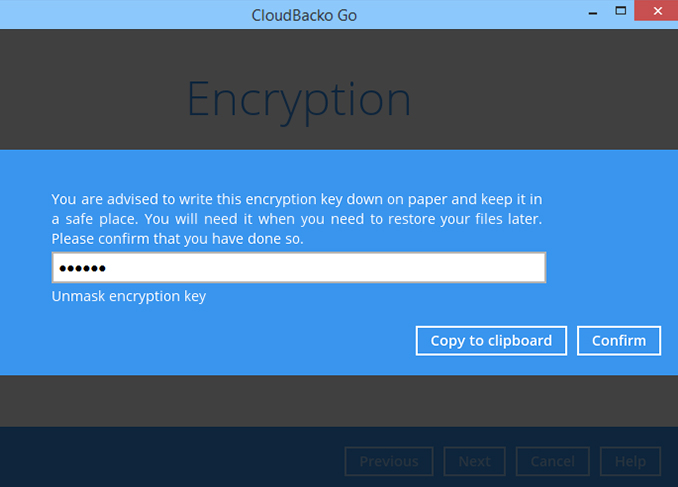
Use the default Encryption setting. Click Next to continue.

-
Click Confirm to continue.
-
Backup set is created.
Click on Backup now to start a backup job or wait for the automated backup to start.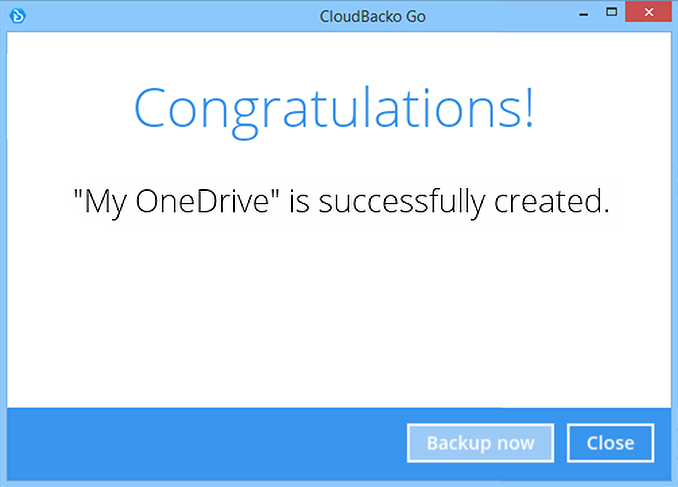


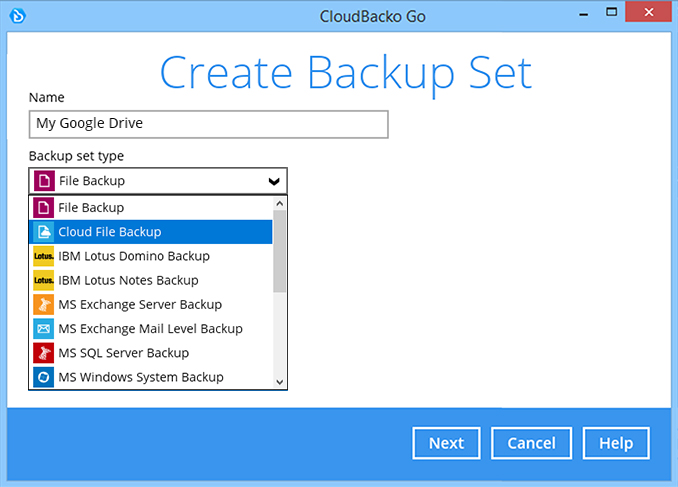
How to create a Google Drive cloud file backup
-
After login to Cloudbacko, click on the Backup Sets tile.

-
Click on the “+” to add new backup set.

-
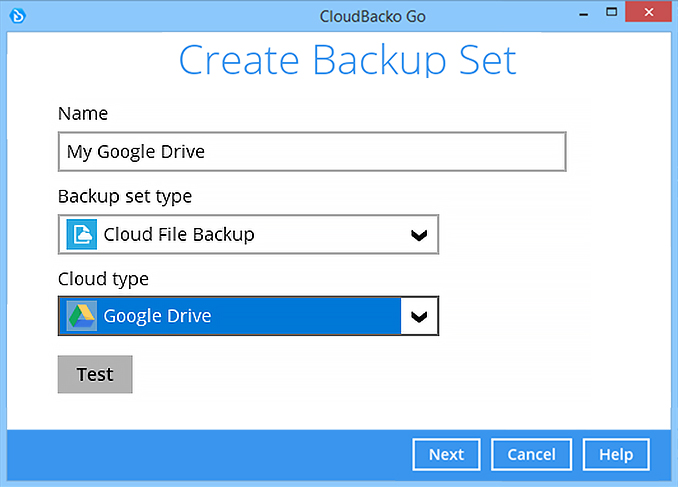
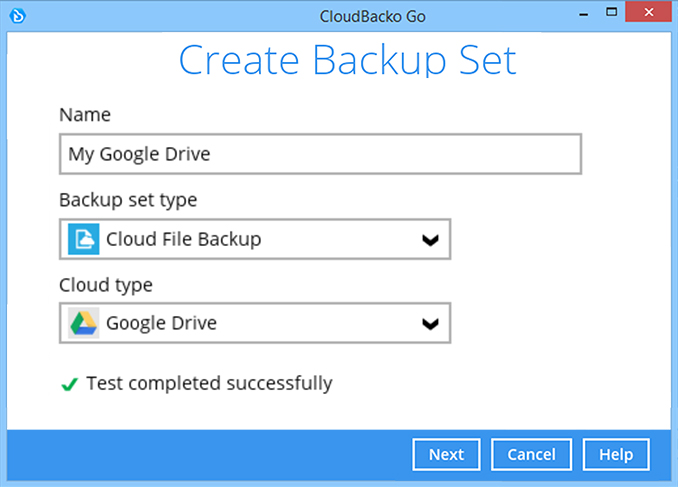
Enter the backup name, i.e. "My Google Drive" and select backup set type Cloud File Backup. Click Next to continue.
-
Select the Cloud type, i.e. Google Drive. Click Next to continue.
-
Your web browser will launch. Enter your Google Drive account name. Click Next to continue.
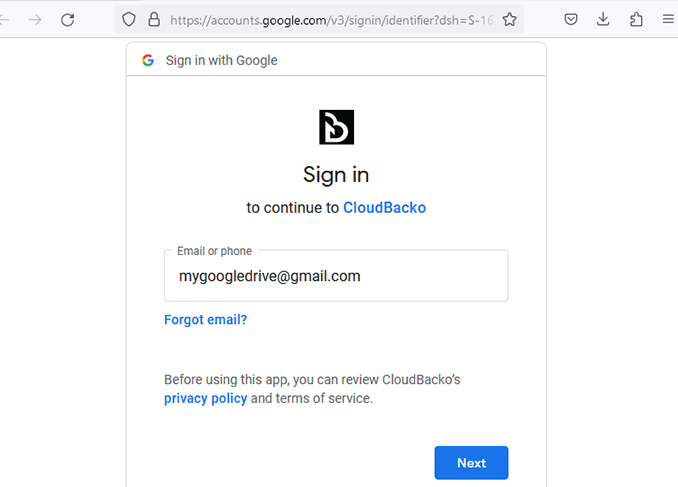
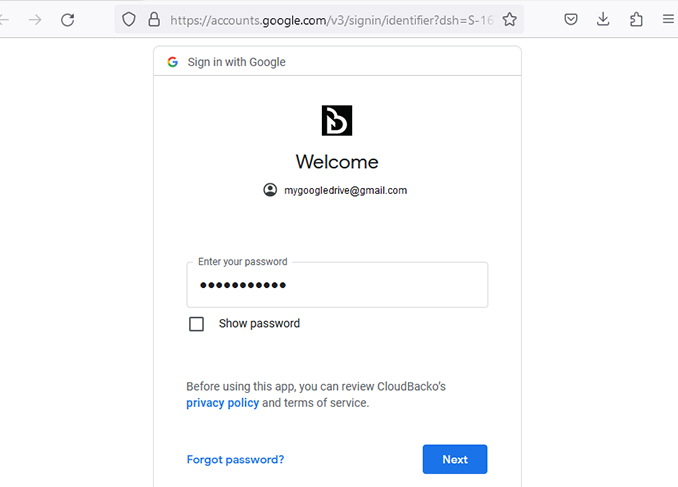
-
Enter your Google Drive password. Click Next to continue.
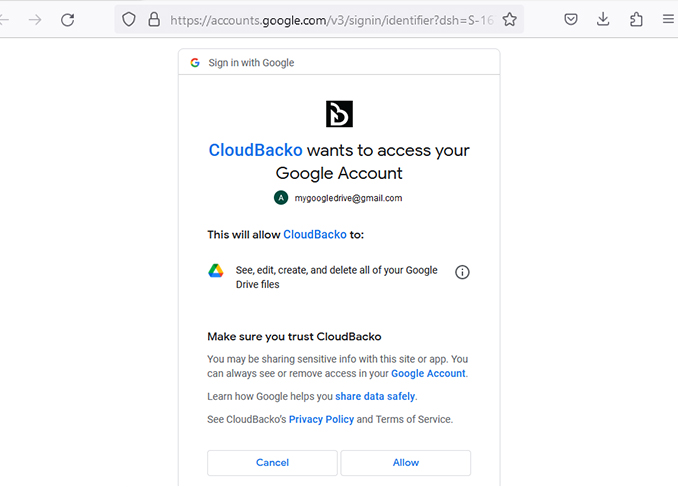
-
Click Allow to continue. (Shown during first time access)
-
When the Authorization Code for Google Drive is displayed, copy the code
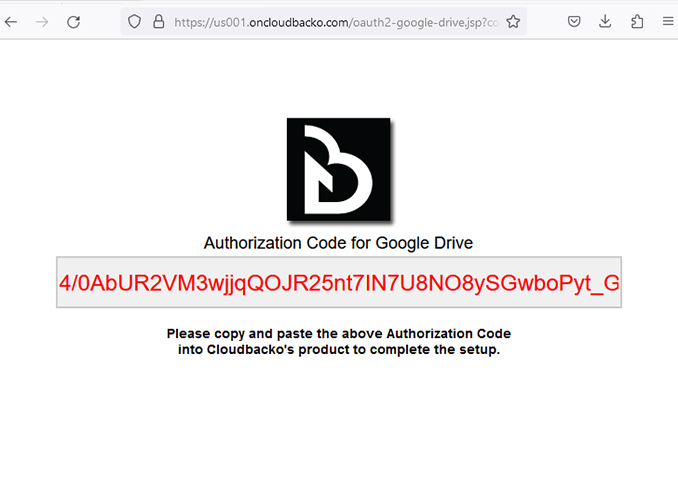
-
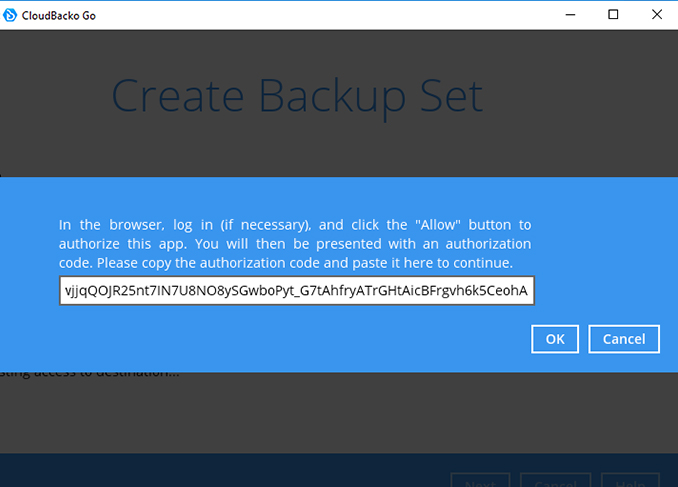
Paste the authorization code back to CloudBacko Go. Click OK to continue.
-
Click Next to continue.
-
Select the folders in your Google Drive account you wish to backup, i.e. Pictures. Click Next to continue.
-
Create an automatic backup schedule, i.e. 20:00 daily and click Next to continue.
-
Select a storage destination, i.e. CloudBacko Drive. Click Next to continue.
-
Use the default Encryption setting. Click Next to continue.
-
Click Confirm to continue.
-
Backup set is created.
Click on Backup now to start a backup job or wait for the automated backup to start.


How to create a Dropbox cloud file backup
-
After login to Cloudbacko, click on the Backup Sets tile.

-
Click on the “+” to add new backup set.

-
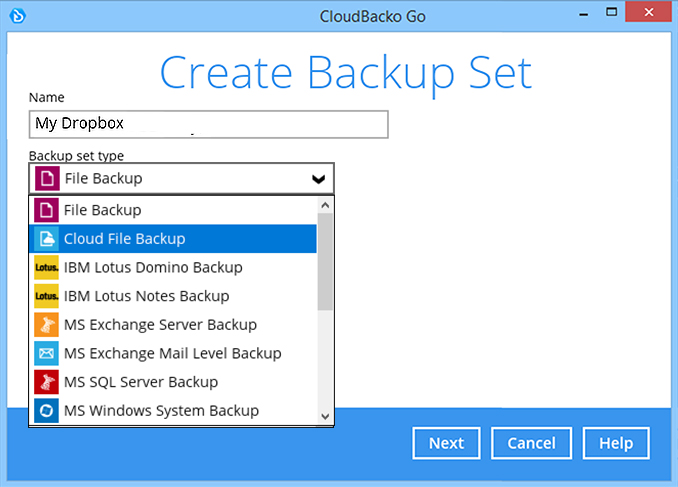
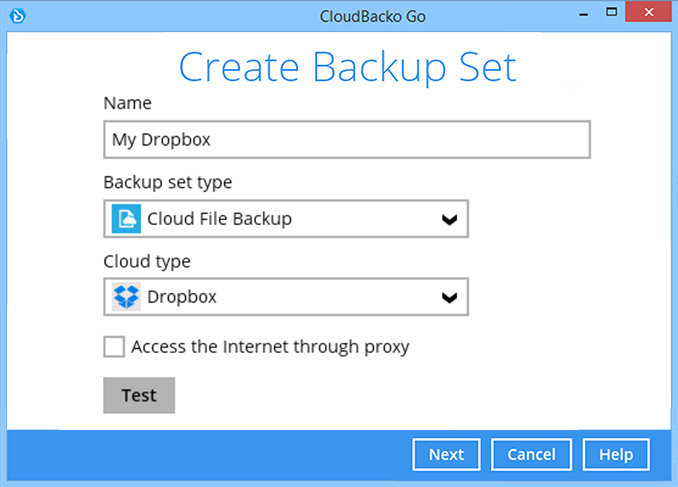
Enter the backup name, i.e. "My Dropbox" and select backup set type Cloud File Backup. Click Next to continue.
-
Select the Cloud type, i.e. Dropbox. Click Next to continue.
-
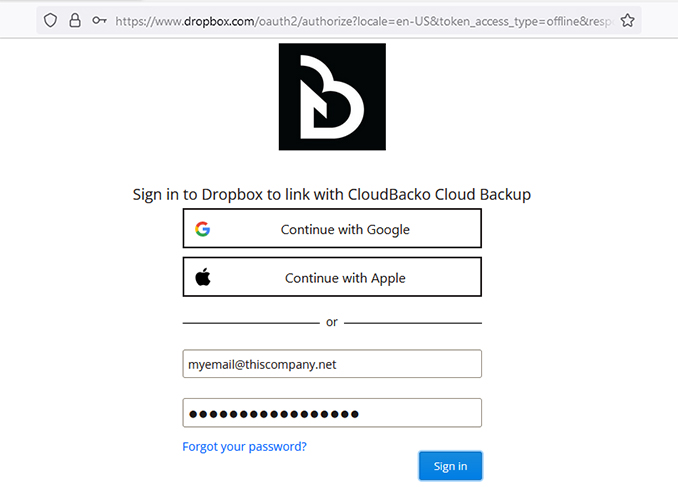
Your web browser will launch. Enter your Dropbox account name and password. Click sign in to continue.
-
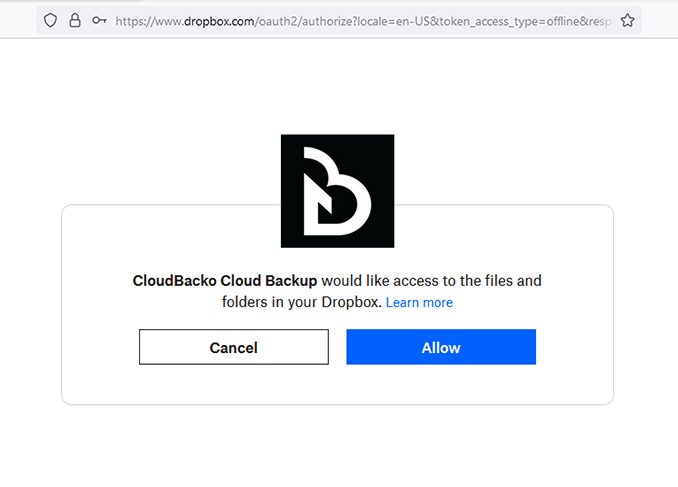
Click Allow to continue. (Shown during first time access)
-
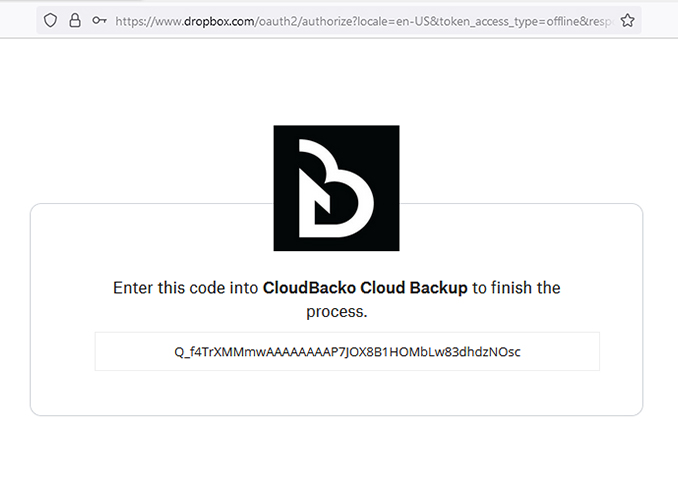
When the Authorization Code for Dropbox is displayed, copy the code
-
Paste the authorization code back to CloudBacko. Click OK to continue.

-
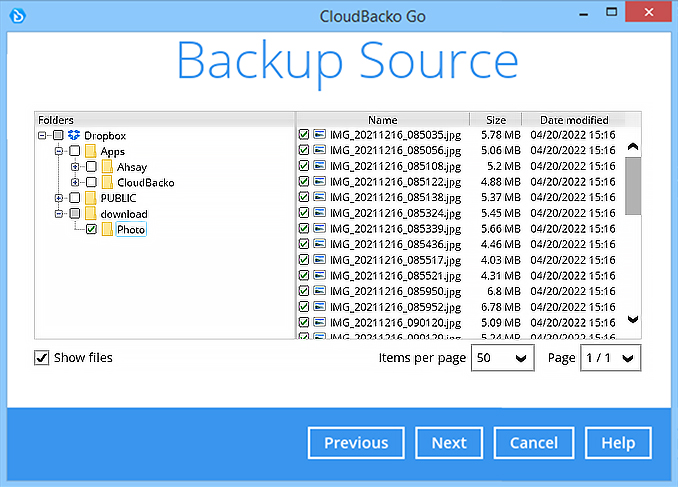
Select the folders in your Dropbox account you wish to backup, i.e. Pictures. Click Next to continue.
-
Create an automatic backup schedule, i.e. 20:00 daily and click Next to continue.

-
Select a storage destination, i.e. CloudBacko Drive. Click Next to continue.

-
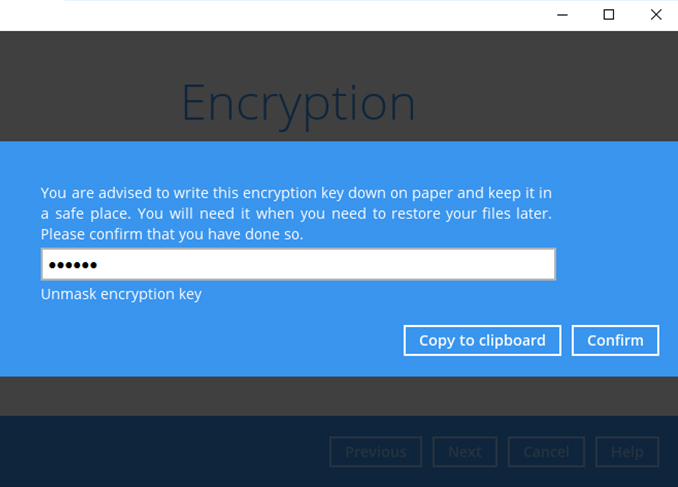
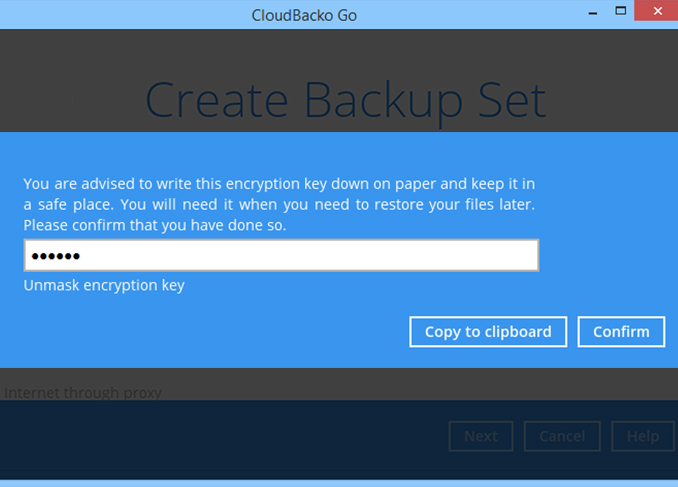
Use the default Encryption setting. Click Next to continue.

-
Click Confirm to continue.
-
Backup set is created.
Click on Backup now to start a backup job or wait for the automated backup to start.


Choose the device type that you want to backup
- iPhone / iPad
- Android phone / tablet
How to create a mobile backup on an iOS device.
-
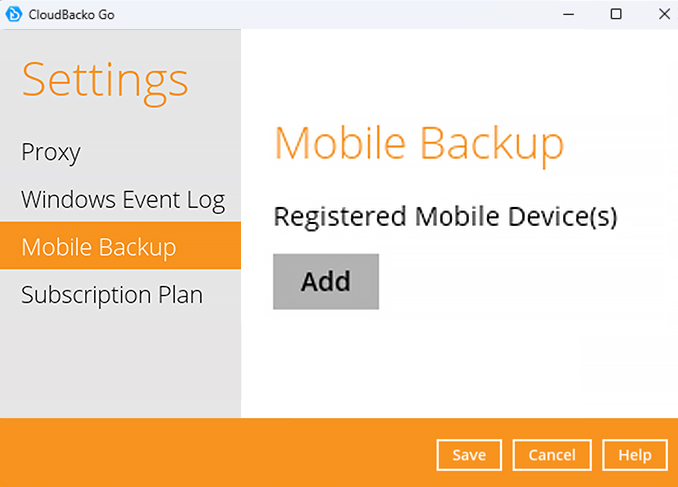
After login to Cloudbacko, click on the Settings tile.

-
Select Mobile Backup. Click Add to continue.
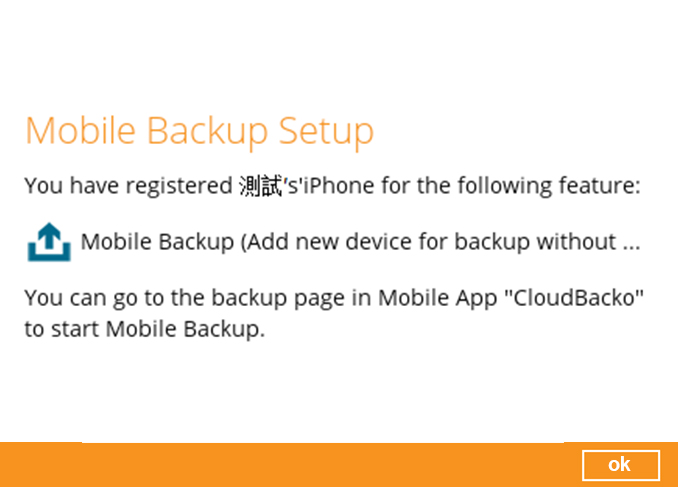
-
After the mobile device is successfully paired with CloudBacko. Click OK to continue.
-
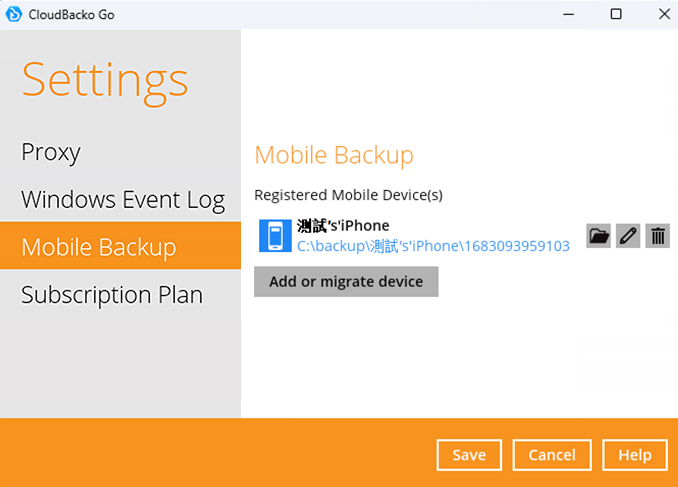
Pairing completed.
-
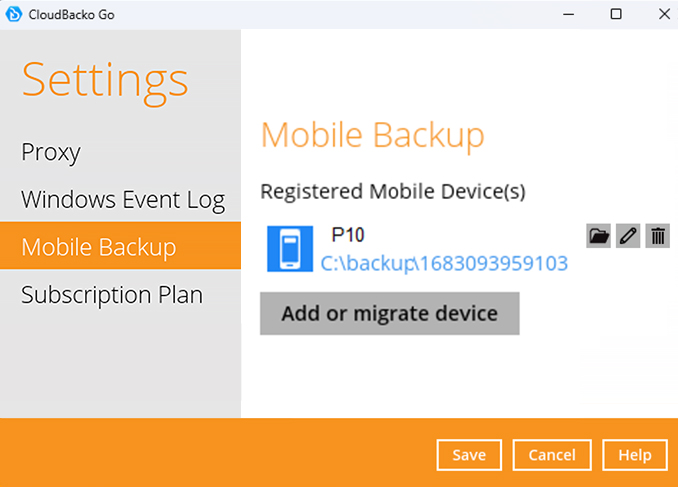
Click Save to save the settings.


-
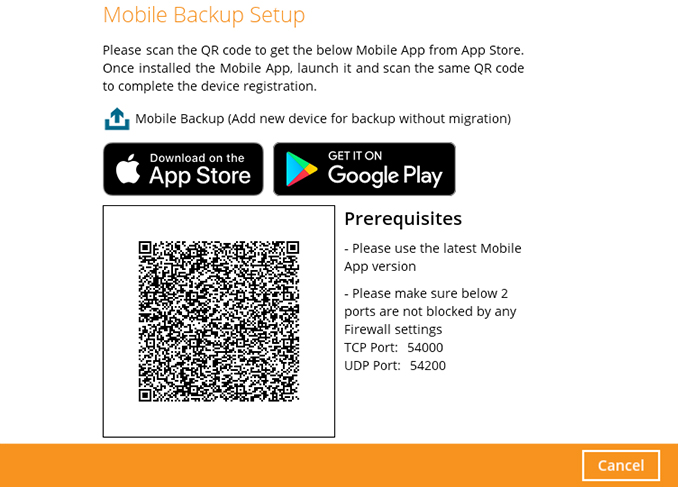
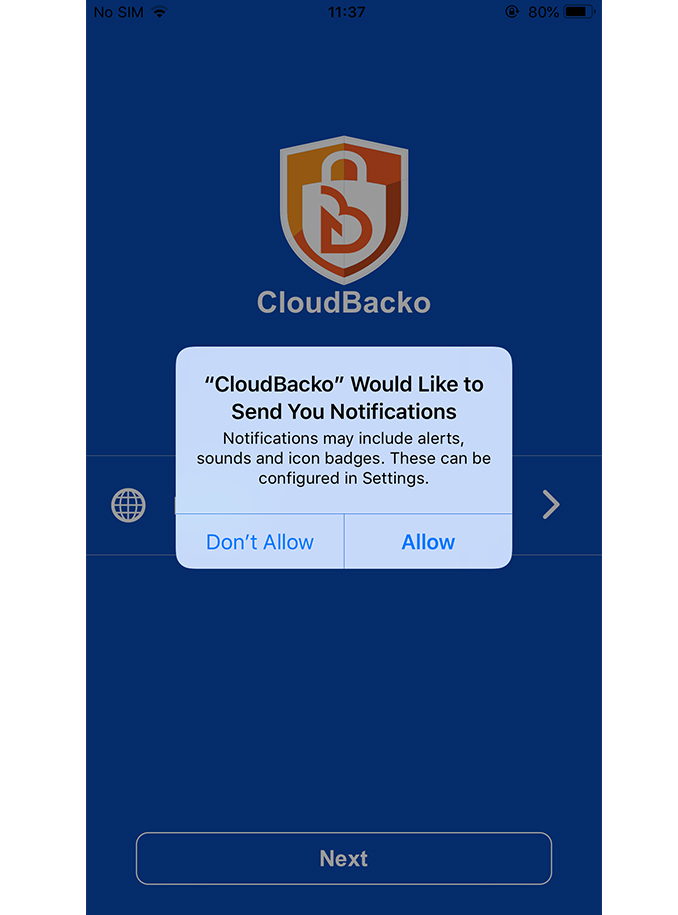
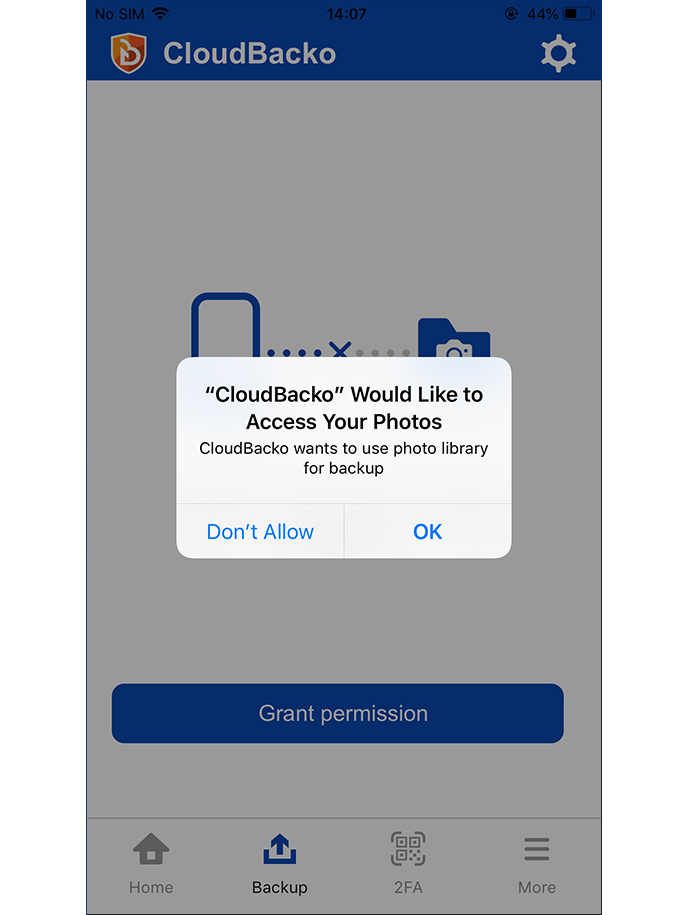
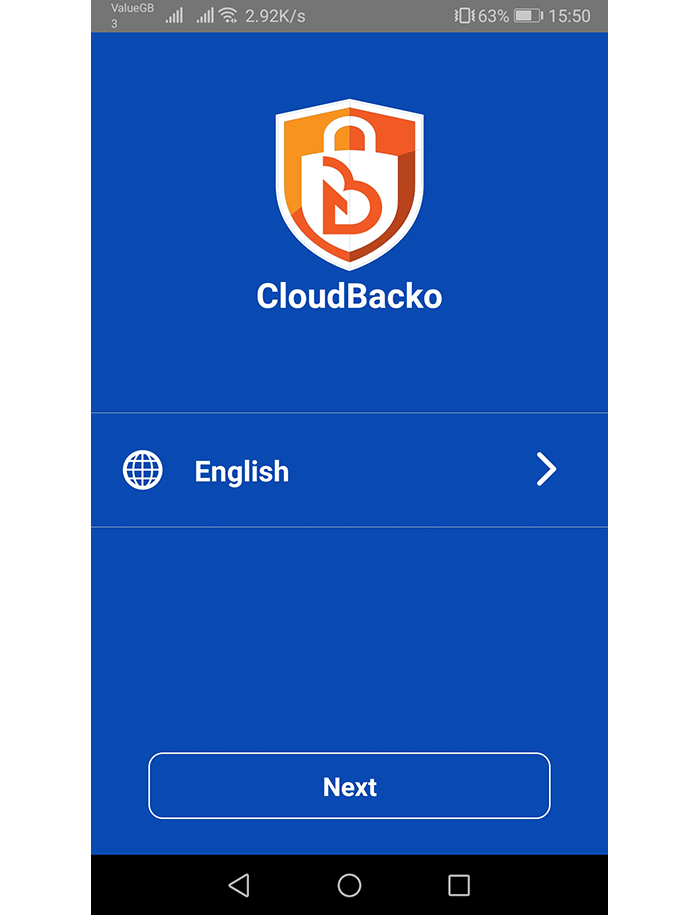
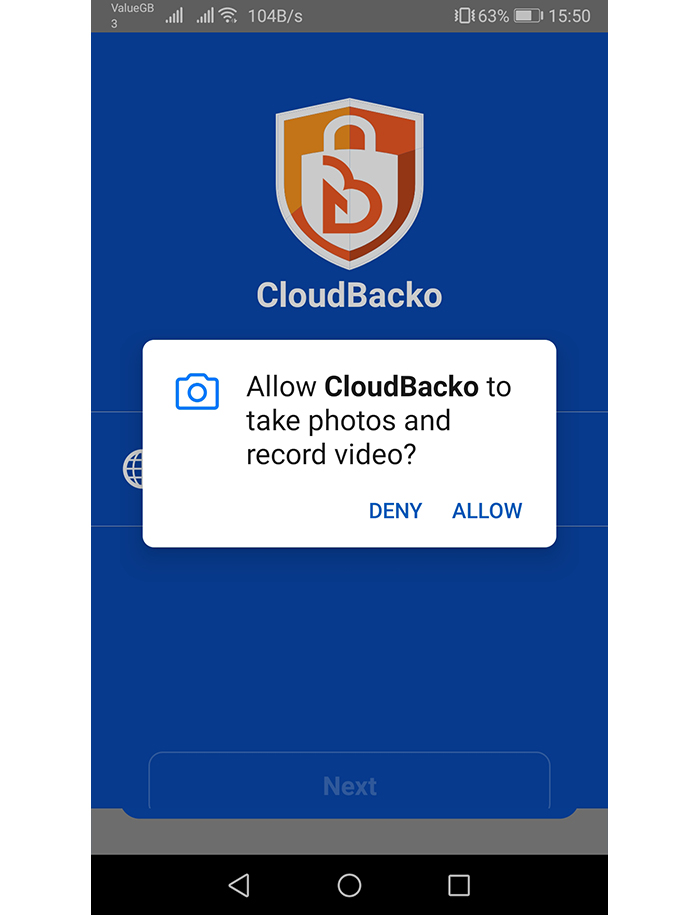
On your iOS device. Click CloudBacko Mobile icon to start app. Press Allow to continue. (Applies to first time usage)
-
Press Next to continue.

-
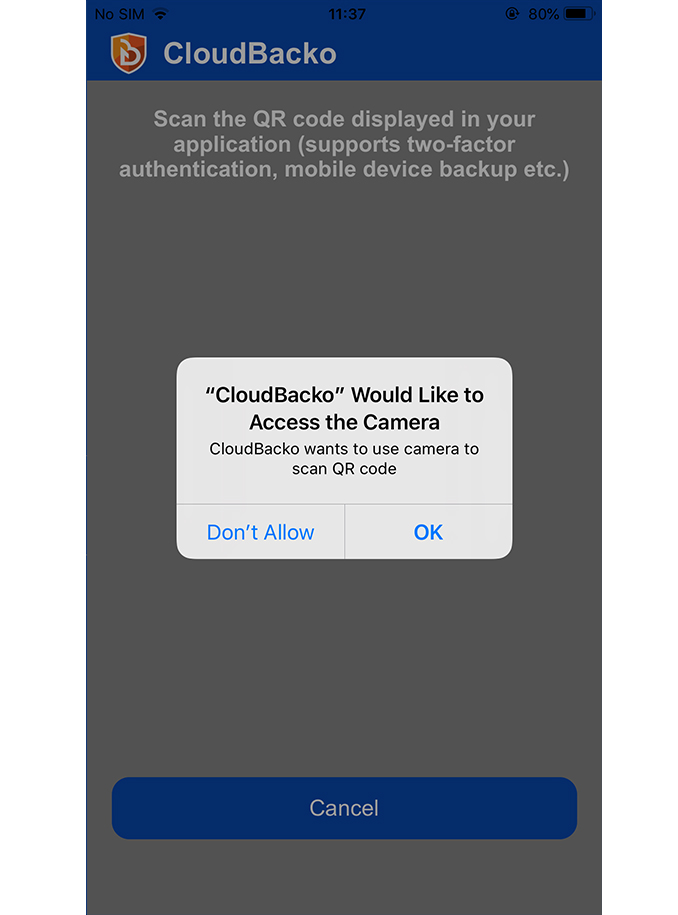
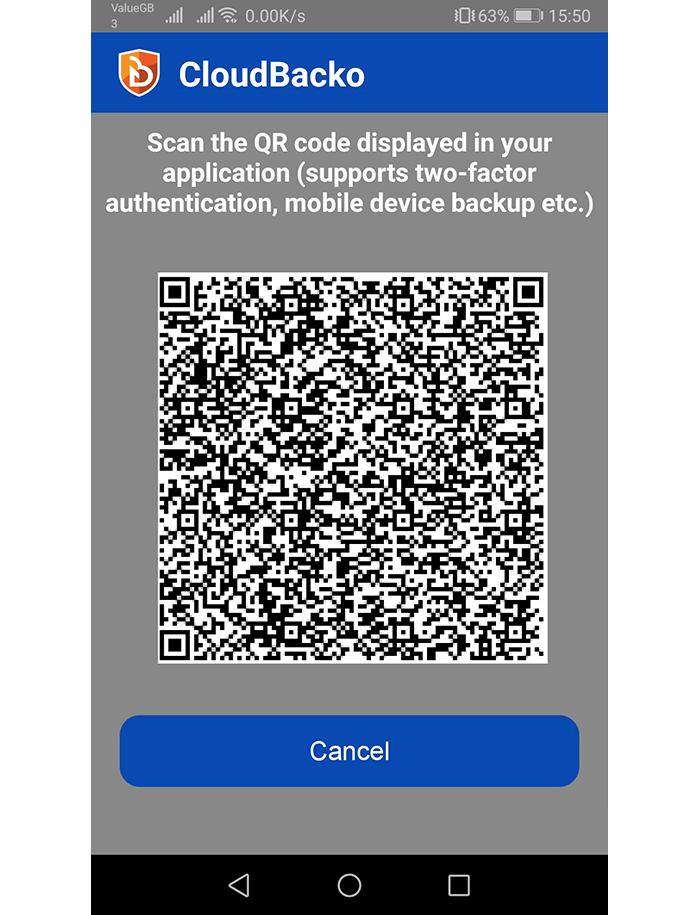
Press OK to continue. (Applies to first time usage)
-
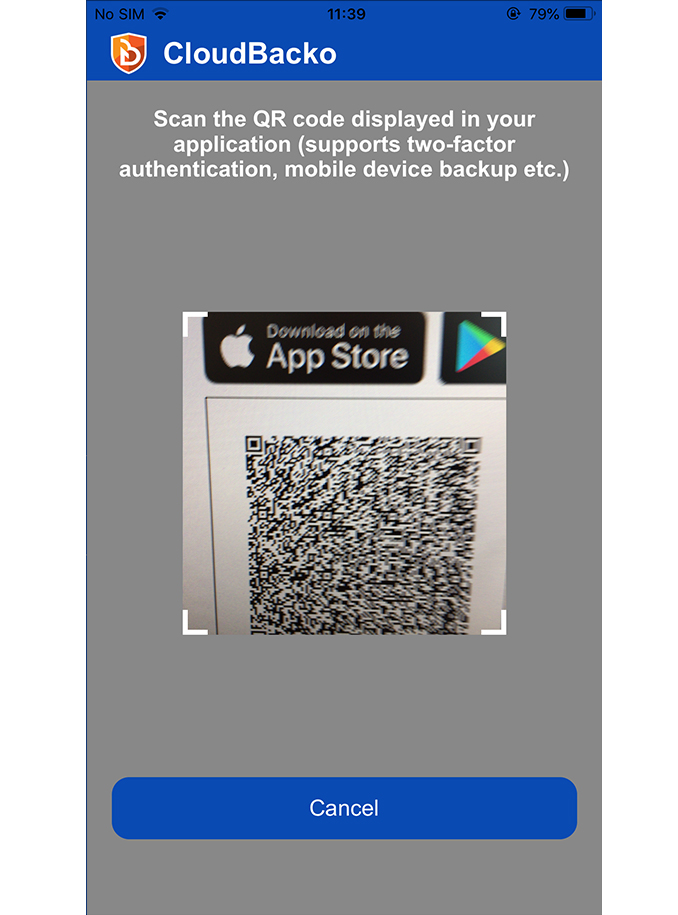
Scan the QR code shown on CloudBacko to pair with the mobile device.
-
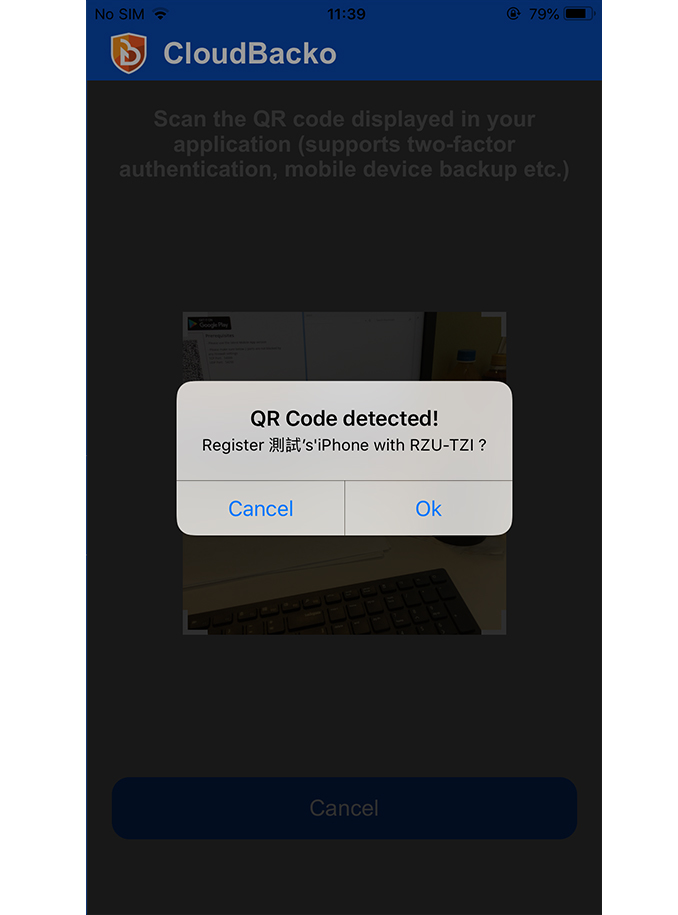
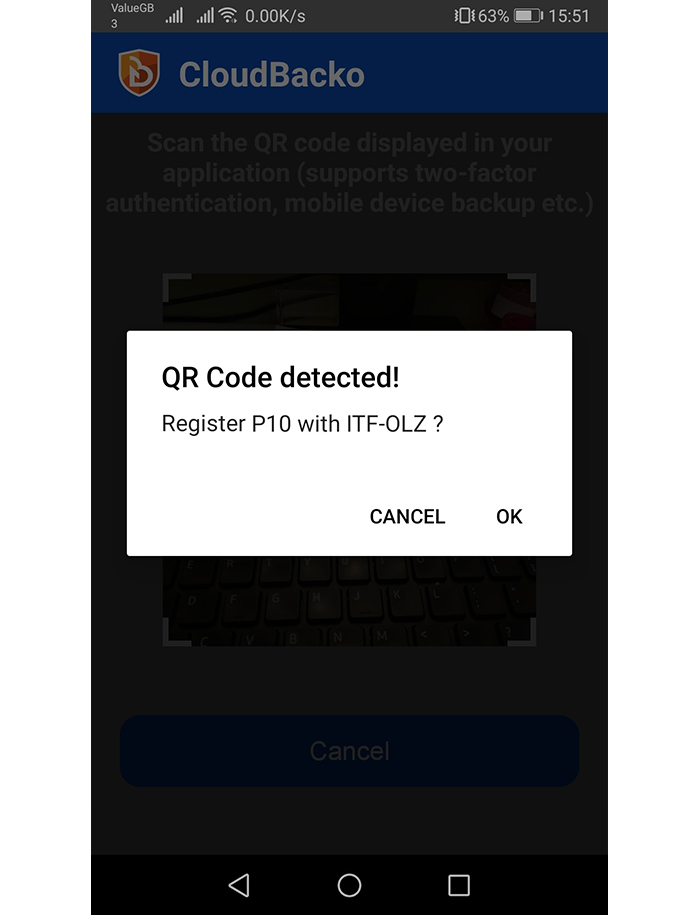
QR Code detected! Press OK to continue.
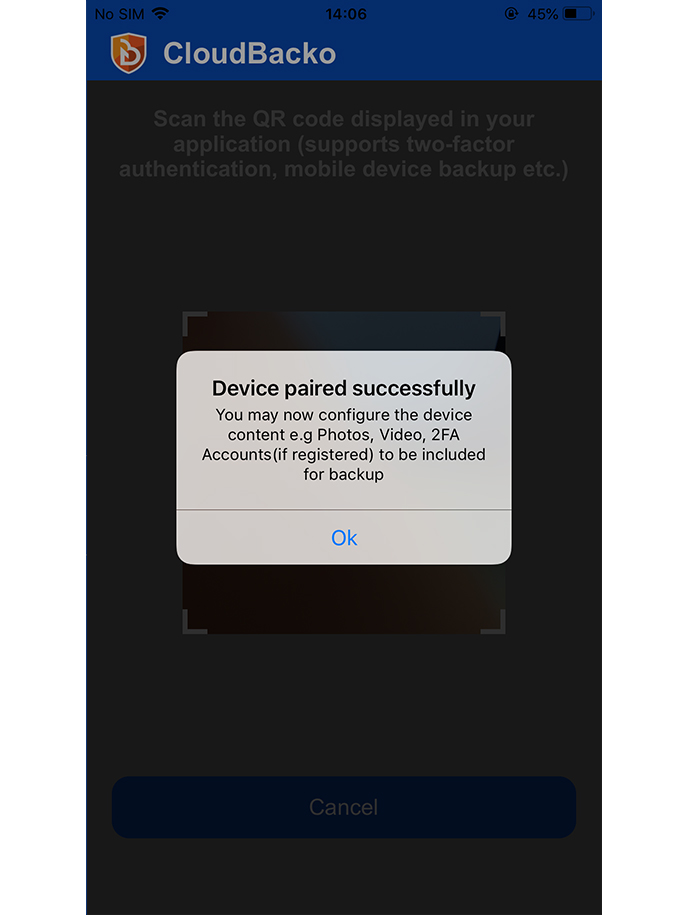
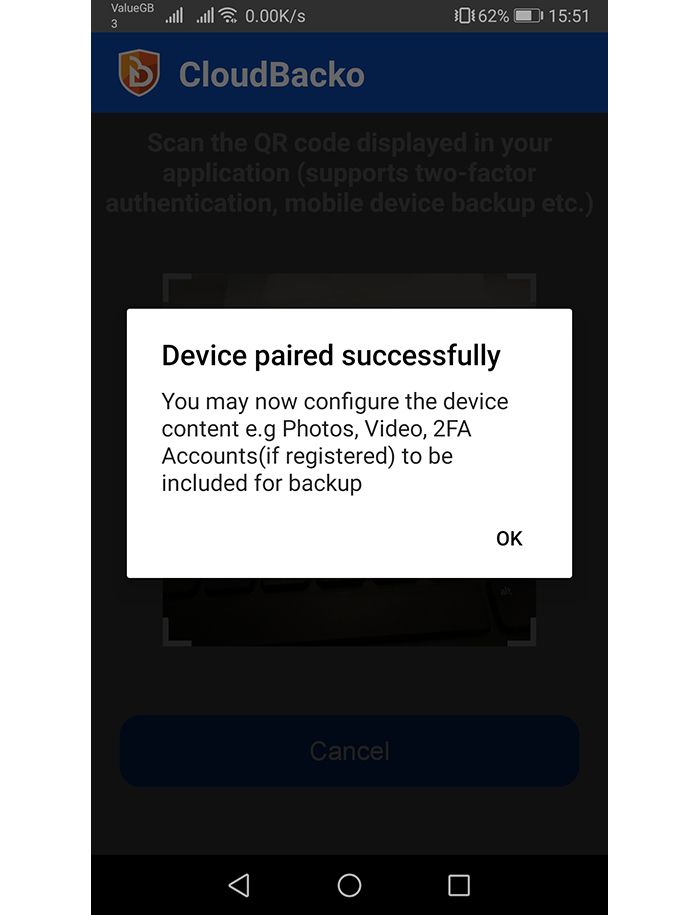
-
Device paired successfully. Press OK to continue.
-
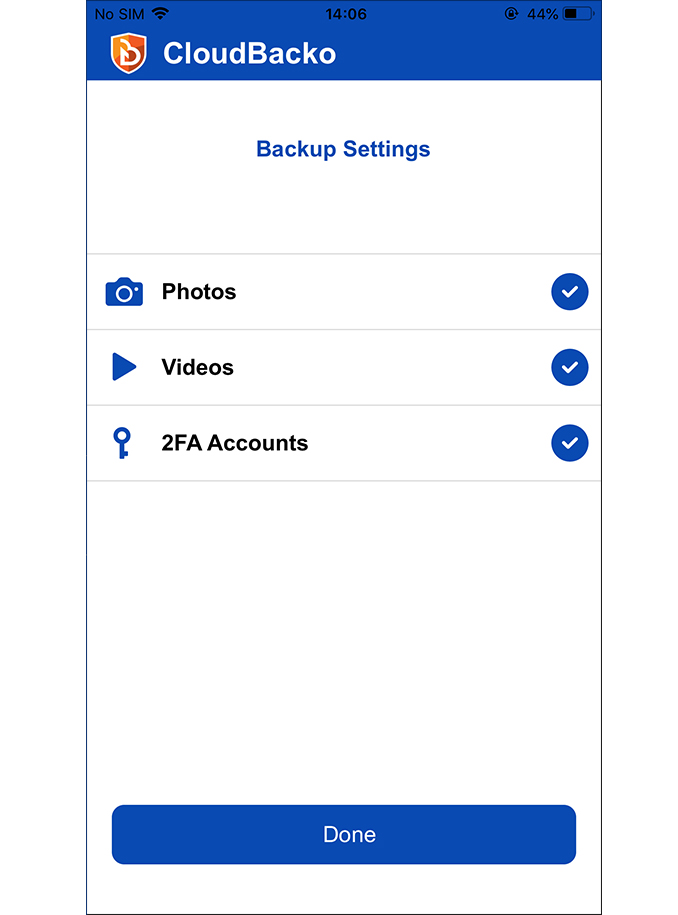
Photos, videos, and 2FA Accounts are selected for backup by default(customize if required). Press Done to continue.
-
Press OK to continue. (Applies to first time usage)
-
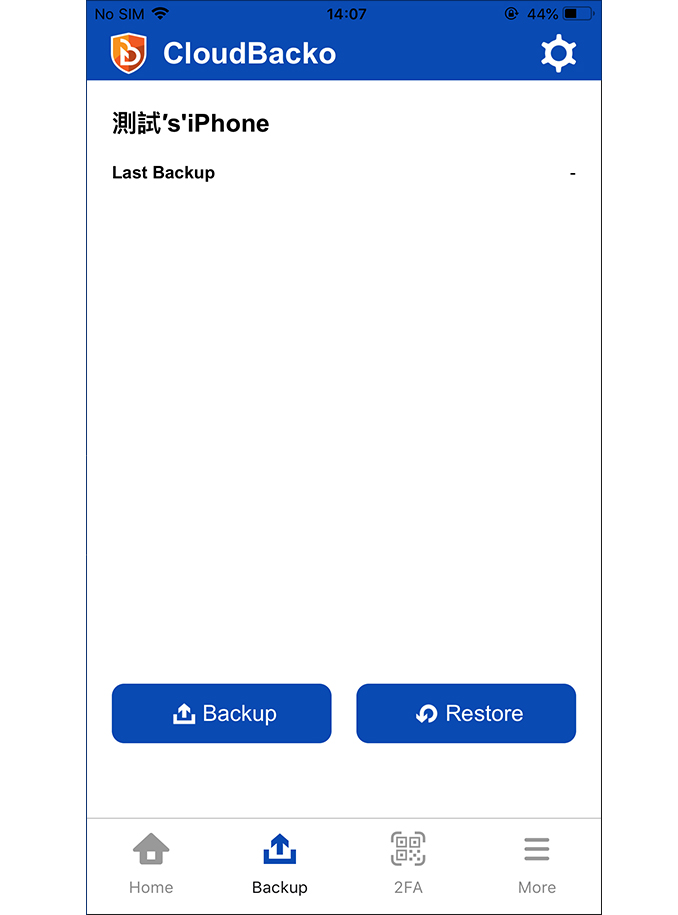
Press Backup to start backup job.


How to create a mobile backup on an Android device
-
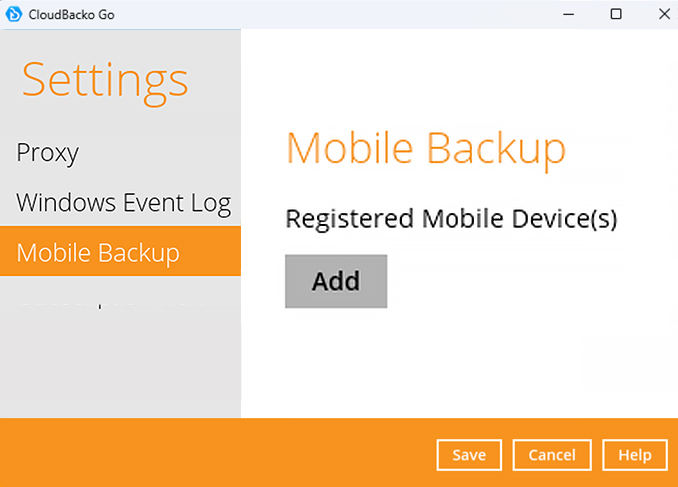
After login to Cloudbacko, click on the Settings tile.

-
Select Mobile Backup. Click Add to continue.

-
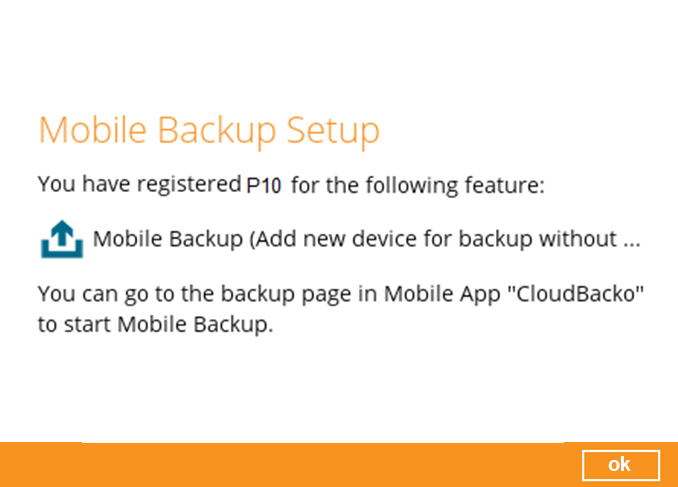
After the mobile device is successfully paired with CloudBacko. Click OK to continue.
-
Pairing completed.


-
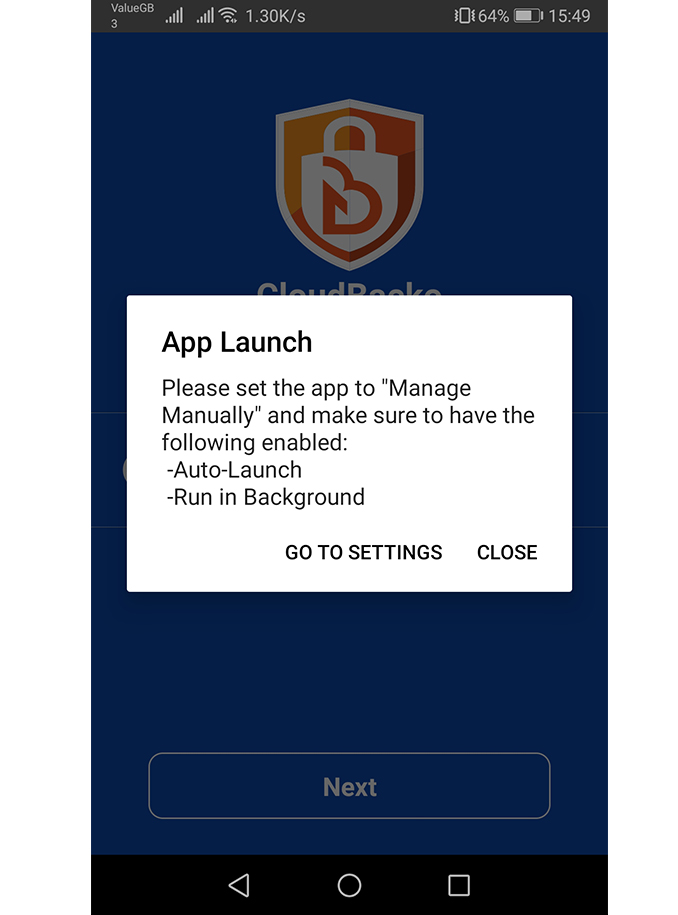
On CloudBacko Mobile. Press Activate and start backup to continue.
-
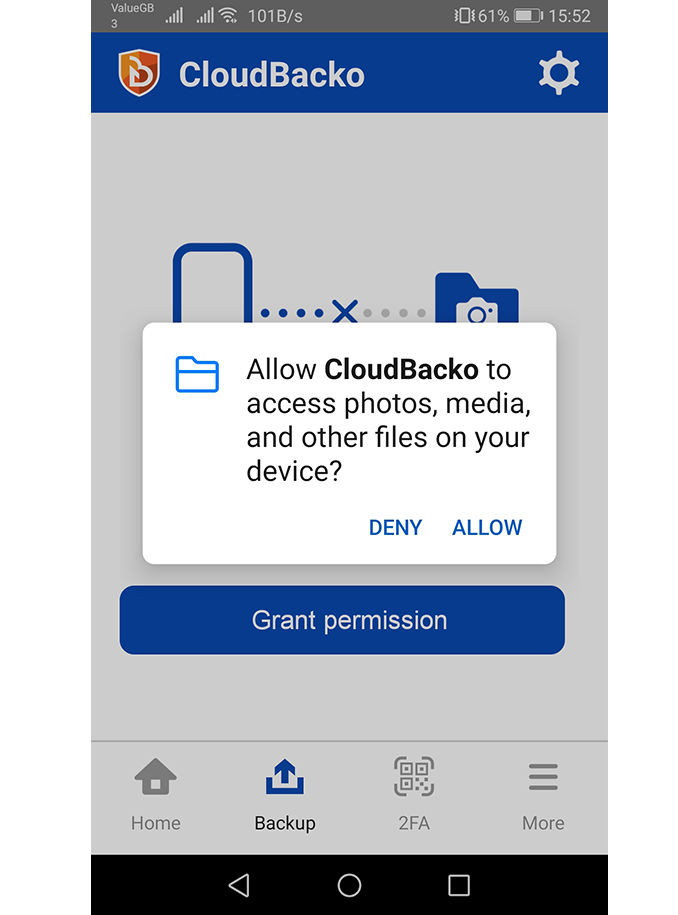
Press ALLOW to continue. (Applies to first time usage)
-
After starting up CloudBacko Mobile. Press Next to continue.
-
Scan the QR code shown on CloudBacko to pair the mobile device
-
Press OK to continue.
-
Press OK to continue.
-
Photos, videos, audio, documents, and 2FA Accounts are selected for backup by default (customize if required). Press Done to continue.

-
Press ALLOW to continue. (Applies to first time usage)
-
Press Backup to start backup job.